A solution has been asked for “How to change TCP port number in Microsoft IIS (Web-Server)”, as he has installed Microsoft IIS and Apache and both were listening on port # 80, although it is simple but following are the steps for changing the TCP port number in Microsoft IIS.
1. Click Start, Administrative Tools
2. Click on Microsoft Internet Information Services (IIS)
3. Expand the Web-Server that you want and then expand the Web-Site in left Pane or double click the web-site and you will get the “Default Page” or Page that you created in right pane.
4. Right click on “Default Page” and choose “Properties”
5. Click “Web Site” tab.
6. Change the TCP Port number in the box (for multiple port settings, click on “Advance”)
7. Click “OK” to save the changes.
I Hope this will be informative for you!
Cheers
Thursday, December 17, 2009
Friday, November 20, 2009
DMVPN for Hub & Spoke Topology
A project has been started to configure VPN between head office and remote branches. This was done simply by configuring site-to-site VPN (See my Blog) between remote branch (Peshawar) and Faisalabad (next hope) as we (Peshawar hope) are using it as our next hope to reach head office. After the basic configuration of site-to-site VPN, we done with it and the communication were successful between two remote offices. The problem arises when Faisalabad configured VPN with another remote office (Abbotabad) now when they start communication with them by giving their peer address under crypto map as shown below, as the link established between the two sites, ping (communication) breaks between Peshawar and Faisalabad when again peer address of Peshawar was given here so communication breaks with the other remote offices.
Hub-Router (config) # crypto map VPN_MAP 10 ipsec-isakmp
Hub-Router (config-crypto-map) # set peer 130.13.x.x
Problem:
The main problem was that we had multiple sites which are using Faisalabad as their next hop, so it becomes HUB, now we required some method to configure VPN for HUB and SPOKE topology. After searching and goggling we came with the solution that DMVPN is the right choice for it.
Solution:
A Dynamic Multipoint Virtual Private Network (DMVPN) is an up gradation of the virtual private network (VPN) configuration process of Cisco IOS-based routers. What DMVPN does is that it prevents the need of configuration of pre-defined static peers in crypto-map and ISAKMP peer statement. An IPsec tunnel between two Cisco routers may be created on an as needed basis. Tunnels may be created between a spoke router and a hub router or between spokes.
DMVPN Spoke is configured with one or more hub IP addresses. DMVPN hub IP addresses are typically static. DMVPN spoke IP addresses may be static, or dynamic. The spoke router is configured with the hub's IP address and allowing the spoke to connect to hub when it is online. The hub router does not need to be configured with the IP addresses of the spoke routers. This allows many-spoke VPN routers to be deployed without the need to configure additional peers on the hub.
For ROUTING we use dynamic routing protocol between the spokes and the hub, as well as other spokes. We can have the choice of using EIGRP or OSPF routing protocols between them as it is used commonly now a days, one of the reason is scalability. We used EIGRP for our internal routing.
Configurations:
I suppose that you are familiar with GRE tunneling configuration and sit-to-site VPN configuration, if not then look at here my blogs for step wise configuration of GRE and VPN as I will be talking about the remaining configuration that are required for DMVPN.
HUB Configuration:
HUB-Router (config) # interface tunnel 0
HUB-Router (config) # ip nhrp authentication cisco120
HUB-Router (config) # ip nhrp map multicast dynamic
HUB-Router (config) # ip nhrp network-id 10
HUB-Router (config) # no ip split-horizon eigrp 100
There is a reason why we use “no ip split-horizon” on hub, see here
HUB-Router (config) # tunnel source fastethernet 0/0
HUB-Router (config) # tunnel mode gre multipoint
HUB-Router (config) # tunnel key 0
Tunnel key is used on Point-to-Point or Multipoint
HUB-Router (config) # tunnel protection ipsec profile Cisco
Spoke Configuration:
SPOKE -Router (config) # interface tunnel 0
SPOKE -Router (config) # ip nhrp authentication cisco120
SPOKE -Router (config) # ip nhrp map multicast dynamic
Note: We can choose either static ip address or multicast (broadcasting/multicasting), if we choose dynamic it means that learn the destination address that are from client registration on hub
SPOKE -Router (config) # ip nhrp map 172.16.2.1 221.120.x.x
The first is the destination tunnel address and second is the public address of destination.
SPOKE-Router (config) # ip nhrp map multicast 221.120.x.x
SPOKE -Router (config) # ip nhrp network-id 10
SPOKE -Router (config) # ip nhrp nhs 172.16.2.1
Where “nhs” is the next hope server address
SPOKE -Router (config) # tunnel source fastethernet 0/0
SPOKE -Router (config) # tunnel mode gre multipoint
SPOKE -Router (config) # tunnel protection ipsec profile Cisco
NHRP is next-hope resolution protocol; not a routing protocol but it make use of routing information. The most prominent feature of NHRP is that it avoids extra router hopes in an NBMA.
Commands:
You can further use the following command to verify and troubleshoot the configurations.
1. show crypto socket ("Display the crypto sockect between NHRP and IPSec)
2. show ip nhrp ("Display the next hope resolution protocol cache entries etc)
3. show ip route
4. show ip eigrp neighbor
5. show crypto ipsec sa ("Display the active channel)
6. show crypto engine connection active ("Display the total encrypted / decrypted SA)
7. show crypto isakmp sa ("Display isalmp security association state (SA)")
You can also do DEBUG for further understanding and logs
1. debug crypto ipsec
2. debig crypto isakmp
3. debug crypto engine
4. debug crypto socket
I hope this will be informative for you !
Cheers :)
Saturday, November 14, 2009
Monitoring Network Interface Traffic / Resource
MRTG can be use to monitor our Linux machine or any other machine network interfcae traffic or even we can monitor our network devices interface traffic like Routers, Switches etc.
MRTG configuration on Linux, to see the interface traffic flow in both in and out direction see my blog, Click here
We can use MRTG on routers and swithces also but for that we have to configure SNMP first and the client side configuration etc. see my blog on detail stpes of SNMP configuration on cisco router and switches, Click here
But we can make it very simple by using Bytemon to monitor network interface traffic, we will install bytemon on client machine and there we can identify the remote device IP Address or Hostname of which traffci we want to analyze, in my case i use my Backup Production Router IP-Address.
1. The following graph shows the overall protocol traffic on both in and out interfaces.

2. The following graph shows HTTP traffic Data.

3. The folowing show the traffic of interface "IN"

4. The following show the traffcie of "OUT" interface.

I Hope this will be informative for you !
Cheers :)
SNMP configuration on Cisco IOS for routers and switches
Simple Network Management Protocol (SNMP) is a UDP-based network protocol. It is used mostly in network management systems to monitor network-attached devices for conditions that warrant administrative attention.
An SNMP-managed network consists of three key components:
1. Managed device = Slave device
2. Agent = software which runs on Slave device
3. Network management system (NMS) = software which runs on Master
A Managed Device is a network node that implements an SNMP interface that allows unidirectional (read-only, ro) or bidirectional access to node-specific information.
Managed devices exchange node-specific information with the NMSs. Sometimes called network elements, the managed devices can be any type of device, including, but not limited to, routers, access servers, switches, bridges, hubs, IP telephones, computer hosts, and printers etc.
An Agent is a network-management software module that resides on a managed device. An agent has local knowledge of management information and translates that information to or from an SNMP specific form.
A Network Management System (NMS) executes applications that monitor and control managed devices or use Bytemon.
SNMP version available are v1, v2 and v3 with SNMPv3 being th most secure. Now a days either SNMPv2 or 3 is using. Following are the basic steps for the configuration of SNMP on cisco devices.
Configuration Stpes:
1. SNMP Community
In the following line CommunnityName is PUBLIC bydefault and its like a password between SNMP management system and the device, while RW means READ and WRITE permission while 10 specify the access-list that you already define on your system or to be defined right now.
PSW-DXX(config)#snmp-server community [CommunityName] RW 10
PSW-DXX(config)#access-list 10 permit 10.0.0.0
2. Chassi-ID Location and Contacts (Optional)
PSW-DXX(config)# snmp-server chassis-id cisco1841
PSW-DXX(config)# snmp-server location PSHsngpl
PSW-DXX(config)# snmp-server contact EngineerNetSysSohail
3. SNMP Trap Setup
Now that SNMP is enabled. It is important and more necessary to send alert messages also known as SNMP traps to the manager so the Network manager can be alerted. This is mostly the case of most of the SNMP Management/Monitoring system.
PSW-DXX(config)# snmp-server host 10.110.1.2 version ?
1 : Version1
2 : Version 2c
3 : Version 3
Note: If you use version 3 then it will ask for auth, noauth or priv(use the SNMPv3 authprov security level). I used SNMPv3 and it will now authenticate by either using v1/v2c community string and sets up the Management server to which the trap messages needs to be sent, The Community Name will be the one that you define above.
PSW-DXX(config)# snmp-server host 10.110.1.2 version 3 auth [CommunityName]
Also sets up the traps and the type of traps to be sent. Here Link up/down status and system reboot traps are sent to the management server.
PSW-DXX(config)# snmp-server enable traps snmp linkup linkdown coldstart warmstart
We can also configure a very good frriend of my and may be your also SYSLOG to monitor your device.
PSW-DXX(config)# snmp-server enable trap syslog
And we also use the following friend which will help us in finding who access with illegal community string.
PSW-DXX(config)# snmp-server trap authentication
I hope this will be informative for you!
Cheers
Saturday, October 31, 2009
Cisco IOS Release 15.0
Cisco release IOS 15.0 after a long time, its the major release after long time, The world's leading network infrastructure software, Cisco IOS, delivers transparent integration of technology innovations, business-critical services, and key hardware support.
Full Detail about the new release can be found here
Cisco also remove some features from 15.0 version like AppleTalk Phase I & II and Service Selection Gateway (SSG).
Key highlights of Release 15 M and T, illustrated in Figure 1 below, include the following:
• Feature inheritance from Cisco IOS Software Releases 12.4T and 12.4 Mainline1
• M (extended maintenance) releases every 20 months - allows customers to qualify/deploy/remain on releases longer with active bug fix support
• Standard maintenance 15 T releases - provides the latest features and hardware support before the next M release becomes available on Cisco.com2
• Rebuilds of Release 15 M and T releases for ongoing bug fixes
• Cisco IOS Software Release 15.0(1)M is the first release
Its Very important to have a product knowledge, so it will be helpfull to read it :)
Cheers
Thursday, October 29, 2009
Booting XM Images on Non-XM 2600 Series Routers
CCIE Preparation in progress and we fell that some of our routers are not able to fulfill our requirements like one of the limitation we can face and I personally faced that our 2600 series routers (2610, 2611, 2620 etc) lack the memory capacity to run the new IOS images, within CCIE (Routing & Switching) boot camp we can quote this problem that it doesn’t support OSPFv3 for IPv6. For us we are lucky that the old 2600 series platform is same as 2600xm series routers just with a bit difference of less processing power and memory capacity. What this means that 2600 series router can boot 2600XM images and therefore run IOS version that support OSPFv3. Now to accomplish this task we have to use “tftpdnld –r” command in rommon mode to boot an IOS image into RAM. As the image will be running from RAM, a TFTP download will be required every time the router is rebooted.
CONFIGURATIONS:
Following is the configuration of a 2610 router running the 12.2(15) T7 IP Plus image. While it does support IPv6 routing but it lacks OSPFv3 support which is our requirement in this case:
CCIE-Router-9 # show version
Cisco Internetwork Operating System Software
IOS (tm) C2600 Software (C2600-J1S3-M), Version 12.2(15) T7, RELEASE SOFTWARE (fc2)
TAC Support: http://www.cisco.com/tac
Copyright (c) 1986-2003 by cisco Systems, Inc
Compiled Sat 09-Aug-03 07:18 by ccai
Image text-base: 0x80008098, data-base: 0x8195144C
ROM: System Bootstrap, Version 11.3(2) XA4, RELEASE SOFTWARE (fc1)
Router uptime is 5 hours, 8 minutes
System returned to ROM by power-on
System image file is "flash: c2600-j1s3-mz.122-15.T7.bin"
cisco 2610 (MPC860) processor (revision 0x202) with 59392K/6144K bytes of memory.
Processor board ID JAD03337409 (4221326695)
M860 processor: part number 0, mask 49
Bridging software
X.25 software, Version 3.0.0
TN3270 Emulation software
2 Ethernet/IEEE 802.3 interface(s)
4 Serial network interface(s)
32K bytes of non-volatile configuration memory
16384K bytes of processor board System flash (Read/Write)
Configuration register is 0x2142 (will be 0x2102 at next reload)
CCIE-Router-9 # config terminal
Enter configuration commands, one per line. End with CNTL/Z.
CCIE-Router-9 (config) # ipv6 unicast-routing
CCIE-Router-9 (config) # ipv6 router ospf 1
CCIE-Router-9 (config) # interface e0/0
CCIE-Router-9 (config-if) # ipv6 ospf 1 area 0
% Invalid input detected at '^' marker.
CCIE-Router-9 (config-if) # exit
CCIE-Router-9 #
In order to boot the XM image we first have to boot the router into rommon mode. To do this reloads the router and press CTRL-BREAK as the router begins to boot.
CCIE-Router-9 # reload
System configuration has been modified. Save? [yes/no]: n
Proceed with reload? [confirm]
*Oct 1 10:59:13.751: %SYS-5-RELOAD: Reload requested by console.
System Bootstrap, Version 11.3(2) XA4, RELEASE SOFTWARE (fc1)
Copyright (c) 1999 by cisco Systems, Inc.
TAC: Home:SW:IOS:Specials for info
PC = 0xfff0a530, Vector = 0x500, SP = 0x680127b0
C2600 platform with 65536 Kbytes of main memory
PC = 0xfff0a530, Vector = 0x500, SP = 0x80004864
monitor: command "boot" aborted due to user interrupt
rommon 1 >
Setting ENVIRONMENT Varaibles:
1. Now next we have to set the environment variables for loading an IOS image via tftp.
rommon 1 > IP_ADDRESS=10.110.9.2
rommon 2 > IP_SUBNET_MASK=255.0.0.0
rommon 3 > DEFAULT_GATEWAY=10.110.9.102
rommon 4 > TFTP_SERVER=10.110.9.102
rommon 5 > TFTP_FILE=FileName.bin
2. Next, issue the "tftpdnld -r" command.
Note: The -r switch is required to instruct the router to load the image to RAM instead of writing it to flash.
rommon 6 > tftpdnld -r
IP_ADDRESS: 10.110.9.2
IP_SUBNET_MASK: 255.0.0.0
DEFAULT_GATEWAY: 10.110.9.102
TFTP_SERVER: 10.110.9.102
TFTP_FILE: FileName.bin
Receiving 2600xm.bin from 192.10.4.254!!!!!!!!!!!!!!!!!!!!
!!!!!!!!!!!!!!!!!!!!!!!!!!!!!!!!!!!!!!!!!!!!!!!!!!!!!!!!!!!!!!!!!!!!!!!!!!
!!!!!!!!!!!!!!!!!!!!!!!!!!!!!!!!!!!!!!!!!!!!!!!!!!!!!!!!!!!!!!!!!!!!!!!!!!
!!!!!!!!!!!!!!!!!!!!!!!!!!!!!!!!!!!!!!!!!!!!!!!!!!!!!!!!!!!!!!!!!!!!!!!!!!
!!!!!!!!!!!!!!!!!!!!!!!!!!!!!!!!!!!!!!!!!!!!!!!!!!!!!!!!!!!!!!!!!!!!!!!!!!
!!!!!!!!!!!!!!!!!!!!!!!!!!!!!!!!!!!!!!!!!!!!!!!!!!!!!!!!!!!!!!!!!!!!!!!!!!
!!!!!!!!!!!!!!!!!!!!!!!!!!!!!!!!!!!!!!!!!!!!!!!!!!!!!!!!!!!!!!!!!!!!!!!!!!
!!!!!!!!!!!!!!!!!!!!!!!!!!!!!!!!!!!!!!!!!!!!!!!!!!!!!!!!!!!!!!!!!!!!!!!!!!
!!!!!!!!!!!!!!!!!!!!!!!!!!!!!!!!!!!!!!!!!!!!!!!!!!!!!!!!!!!!!!!!!!!!!!!!!!
!!!!!!!!!!!!!!!!!!!!!!!!!!!!!!!!!!!!!!!!!!!!!!!!!!!!!!!!!!!!!!!!!!!!!!!!!!
!!!!!!!!!!!!!!!!!!!!!!!!!!!!!!!!!!!!!!!!!!!!!!!!!!!!!!!!!!!!!!!!!!!!!!!!!!
!!!!!!!!!!!!!!!!!!!!!!!!!!!!!!!!!!!!!!!!!!!!!!!!!!!!!!!!!!!!!!!!!!!!!!!!!!
!!!!!!!!!!!!!!!!!!!!!!!!!!!!!!!!!!!!!!!!!!!!!!!!!!!!!!!!!!!!!!!!!!!!!!!!!!
!!!!!!!!!!!!!!!!!!!!!!!!!!!!!!!!!!!!!!!!!!!!!!!!!!!!!!!!!!!!!!!!!!!!!!!!!!
!!!!!!!!!!!!!!!!!!!!!!!!!!!!!!!!!!!!!!!!!!!!!!!!!!!!!!!!!!!!!!!!!!!!!!!!!!
!!!!!!!!!!!!!
File reception completed.
Program load complete, entry point: 0x80008000, size: 0x1176b34
Self decompressing the image: #######################################
############################################################ [OK]
Do show running-config, we can now see that the router has booted and is running IOS 12.2(15) T14 Enterprise Plus, which is only officially supported as a 2600XM image. Most importantly our 2610 router now has OSPFv3 support.
CCIE-Router-9 > enable
CCIE-Router-9 # configure terminal
Enter configuration commands, one per line. End with CNTL/Z.
CCIE-Router-9 (config) # ipv6 unicast-routing
CCIE-Router-9 (config) # ipv6 router ospf 1
CCIE-Router-9 (config-rtr) # ?
area: OSPF area parameters
auto-cost: Calculate OSPF interface cost according to bandwidth
compatible: OSPF compatibility list
default: Set a command to its defaults
default-information: Distribution of default information
default-metric: Set metric of redistributed routes
discard-route: Enable or disable discard-route installation
distance: Administrative distance
CCIE-Router-9 (config) # interface e0/0
CCIE-Router-9 (config-if) #ipv6 ospf ?
<1-65535>: Process ID
cost: Interface cost
database-filter: Filter OSPF LSA during synchronization and flooding
dead-interval: Interval after which a neighbor is declared dead
demand-circuit: OSPF demand circuit
flood-reduction: OSPF Flood Reduction
hello-interval: Time between HELLO packets
mtu-ignore: Ignores the MTU in DBD packets
neighbor: OSPF neighbor
network: Network type
priority: Router priority
retransmit-interval: Time between retransmitting lost link state
advertisements
transmit-delay: Link state transmit delay
Note: The router may not or may display a warning that it is short on processor memory. Ensure to save your configuration early and often in order to avoid losing our work due to a router crash.
To store your router configuration automatically when you save your configuration using write command, consult my post here
Any comments and suggestion will be highly appreciated :)
I hope this will be informative for you !
Cheers :)
Sunday, October 25, 2009
Cisco VPN Client for Windows 7
We can say that October 2009 is the best month for cisco in terms of new introduction like IOS 15, ISR 2nd Generation and the new version of CCIE, Now a windows 7 user face many difficulties in terms of having third party softwares like cisco VPN client so it’s time for Windows 7 and MacOS Snow Leopard to have Cisco VPN Client and Cisco SSL AnyConnect VPN Client versions, available to download.
The Cisco AnyConnect VPN Client provides remote users with secure VPN connections to the Cisco ASA 5500 Series Adaptive Security Appliance using the Secure Socket Layer (SSL) protocol and the Datagram TLS (DTLS) protocol.
AnyConnect provides remote end users with the benefits of a Cisco SSL VPN client, and supports applications and functions unavailable to a clientless, browser-based SSL VPN connection. It runs on Microsoft Windows, Windows Mobile, Linux, and Mac OS X, and supports connections to IPv6 resources over an IPv4 network tunnel. We can configure the security appliance to uninstall AnyConnect from the endpoint after the connection terminates, or it can remain on the remote PC for future SSL VPN connections.
In addition to the Cisco Adaptive Security Appliance 5500 Series, Cisco IOS supports AnyConnect.
AnyConnect Client 2.4 runs on the following new platforms:
•Microsoft Windows 7 (32-bit and 64-bit). See "System Requirements."
•Mac OS X 10.6 and 10.6.1 (both 32-bit and 64-bit).

The following sections describe the new features in Release 2.4, For Detail visit this link AnyConnect
•Split DNS Fallback
•Trusted Network Detection
•Simple Certificate Enrollment Protocol (SCEP)
•Prompting Users to Select Authentication Certificate
•Scripting
•Proxy Support Enhancement
•CSD Integration
•PEM File Certificate Store
•FIPS and Additional Security in the New AnyConnect Local Policy
Monday, October 19, 2009
Setup SSH Server on Fedora
SSH is installing by default on installation of Fedora operating system itself. In this post we will go through the basic setup of SSH server on Fedora Operating System.
Checking SSH server status
a. Using the service command to check the current status of the sshd
[root@myserver ~]# service sshd status
sshd is stopped
[root@myserver ~]#
b. Start SSH server
Start the sshd process using service command.
[root@myserver ~]# service sshd start
Starting sshd:.............................................[ OK ]
[root@myserver ~]#
Automatically start SSH server
By using chkconfig command we can make sure the automatic starting of ssh services when the system reboot. Before this use the following commands to make sure the current status and configuration of SSH services on this machine.
1.Use the following command to check the current status of the sshd
[root@myserver ~]# chkconfig –-list sshd
sshd 0:off 1:off 2:off 3:off 4:off 5:off 6:off
[root@myserver ssh]#
2. Use chkconfig command to automatically start the sshd service for runlevel 3, 4 and 5.
[root@myserver ssh]# chkconfig --level 345 sshd on
[root@myserver ssh]#
3. Verify the change for shhd on runlevel 3, 4 and runlevel 5.
[root@myserver ssh]# chkconfig --list sshd
sshd 0:off 1:off 2:off 3:on 4:on 5:on 6:off
[root@myserver ssh]#
Basically we have done the basic setup process now we can proceed with the confirmation of the SSH services.
I hope this will be informative for you !
Cheers
Monday, October 12, 2009
Clear / Flush DNS Cache to Speed up Internet
DNS (Domain Name Server) cache (A temporary computer memory stored the recent visit pages and help you in quick processing of your request) is stored by Windows (XP and Vista). This cache helps is faster opening of websites already visited on the computer. However, At times this cache becomes corrupted and needs to be cleared.
Clear / Flush Cache Steps
1. Click Start > Run
2. Type cmd and click OK.
3. In black window, type ipconfig /flushdns and press Enter key
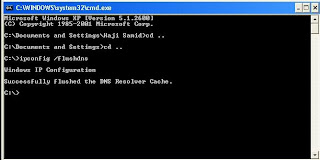
You will see the confirmation message as show above in the picture, There is a space between the ipconfig and flushdns.
I hope this will be informative for you !
Clear / Flush Cache Steps
1. Click Start > Run
2. Type cmd and click OK.
3. In black window, type ipconfig /flushdns and press Enter key

You will see the confirmation message as show above in the picture, There is a space between the ipconfig and flushdns.
I hope this will be informative for you !
How to Block a Website on a Node
If you want to block a web site from vewing on your windows machine, follow these steps to to get the required result.
Steps:
1. c:\WINDOWS\system32\drivers\etc
2. Open hosts file there and append the following line at the end
127.0.0.1 BlockSiteName.com
Note:Replace BlockSiteName with the website name that you want to block on your machine.
3. The go to start --> start --> run --> type
c:\> ipconfig \flushdns
There is a space between the ipconfig and flushdns, now the site will be block but rememberif any one know the ip address of the required site so he can access it still :(
I hope this will be informative for you !
Cheers :)
Sunday, October 11, 2009
Linux: Proxy sshd(pam_unix) Authentication Failure
While looking to my /var/log/message on Linux ( Squid Server, DHCP), i saw the error message shown as title of the post, so after a bit googling i find the solution that it is due to the direct login failure to the proxy server, so to turn off these messages and to avoid the problem we have to disable the direct login of the root account.
The sshd_config file is located at /etc/ssh/sshd_config and it is probably the most common place to find it. If not, we can search for it
# edit sshd_config file
What we want to do is edit this file. We need to uncomment and edit just one line inside this file, at least.
# Vi /etc/ssh/sshd_config
we should be viewing the contents of this file now. We're looking for
#PermitRootLogin yes
Just remove the hash sign (to uncomment the line, or enable it) and change the value to NO. It should look like this after the modifications:
PermitRootLogin no
To make the changes working we have to start the sshd services
# service sshd restart
Now everytime we try to login to our proxy we will using our ordinary user account and then we can substitute to root user.
I hope this will be informative for you !
Cheers :)
Friday, October 9, 2009
Squid Error: No running copy
I saw this error while troubleshooting another problem on squid (DNS issue)
[root@pswproxy etc] # service squid status
squid (pid 3070 3068) is running...
squid: ERROR: No running copy
This is normally due to squid.pid file missing, since this file is present whenever squid is running, if this file is missing squid will not work. If it is deleted by mistake so still squid will be in running condition and will not work properly, so I found this article very useful. In my case I just restart the squid services and it starts working.
I hope this will be informative for you!
Cheers :)
Thursday, October 8, 2009
Squid Error: Reply from unexpected source: 10.110.9.180 # 53, Expected 58.x.x.x # 53
We got problem in our Proxy Server (Squid), we were unable to access internet, The first problem was so pathetic as we were able to ping our local servers that are in LAN but were not able to ping our DNS, after checking our cable and basic network configuration, we got the solution and now we can ping our DNS also, but again PROBLEM start here as we are now able to ping our DNS properly but when we try nslookup so it results in error shown as a subject of this blog. To find out what is the reason behind this error we had to pass from some basic steps to find it exists, let’s look at those steps?
1. First check that our request are reaching to the destination or not, if not so where the packets are dropped, use the following command
# mtr your-dns-ipaddress
or
# traceroute your-dns-ipaddress
2. Check /etc/resolve.conf, for proper DNS entry, the entry should be like
# vi /etc/resolve.conf
nameserver 58.x.x.x
# service network restart
The entry in my case was correct, so we try ping again and it was working but with nslookup the same result (error) was produced.
3. Now issue the following command to check for the proper / correct gateway:
# netstat –r
or
# route –n
The gateway was also perfectly right but still we were not able to do nslookup. Then we made a change in the /etc/resolve.conf file (change our DNS address to another, so it starts working but that was not a good solution as we are directed to use the original one)
After googling and help from my teacher (Nayyar Ahmad) we were at the opinion that TWO Reasons can subsist in this case:
1. Firewall between our machine and DNS and it is blocking port 53 as we can ping. We have communication channel between both just port#53 has problem.
2. DNS services are not running. As we can ping the machine but services are not running, we can check the services from following command
# service named status
Solution:
It was so simple, when we consult the system administrator of head office so they were not allowing our traffic when he added our dns address so everything was working normal.
I hope this will be informative for you!
Cheers :)
ICMP: Source Squench
Source Quench is an ICMP based mechanism used by network devices to inform data sender that the packets can not be forwarded due to buffers overload. When the message is received by a TCP sender, that sender should decrease its send window to the respective destination in order to limit outgoing traffic.
Source Squench has been not consider now a days any more becoz of some reason: i.e
1. Source Squench message can lost in the way to sender.
2. Source Squencs carry very little information per packect say it only sense basci information regarding congestion.
3. Source Quench messages, like all ICMP messages, are expensive for a router to generate. This is bad because the congestion control mechanism could contribute additional congestion, if router processing resources become a bottleneck.
4. Source Squench can also cause Denial of Service.
In effect, ICMP Source Quench messages are almost never generated on the Internet today, and would be ignored almost everywhere if they still existed.
Wednesday, October 7, 2009
Tunneling SSH over HTTP
At times we need to access certain files that we left at home, it is quite possible that some environments and ISPs have strict firewall rules that can make our life miserable and tough in a sense that they have disallow the use of SSH and allows you to use HTTP proxy. “It is possible to use that HTTP proxy as a transport for SSH.”
The purpose of this article is not to advocate breaking out of your environment’s firewall if you have a policy that expressly prevents that or outbound SSH access! Unfortunately in some case it is blocked without any real reason and at times they may allow you to use SSH. In some environments, however, the explicit denial of outbound SSH is required and for that reason we should respect the policy and not override that. I am not at all advocating breaking any rules unless you have permission, exception or proper orders from the people that should provide it.
This all we can done using Corkscrew, click on it and download the source for Corkscrew. Corkscrew is an HTTP-tunneling programming that does not require server-side modifications to work. It is also cross-platform and will work on most client systems.
Steps to Configure:
1. Download it from this source, click on source
2. To build Corkscrew, simply unpack the file and write below commands in the Corkscrew directory
. /configure
make
or make install
3. Using Corkscrew with SSH/OpenSSH are very simple just copy the resulting corkscrew application to somewhere in your ~/.ssh/config, and add:
Host somehost
Hostname somehost.example.com
ProxyCommand /home/user/bin/corkscrew proxy.example.com 8080 %h %p
Replace the hostname with the host you are attempting to SSH into, and replace “proxy.example.com” with the actual HTTP proxy. You may also need to replace the port (8080) if the proxy listens on an alternate port (i.e., port 3128 in the case of Squid). OpenSSH transparently converts the %h to the hostname to connect to (somehost.example.com) and the %p to the port to connect to (22, by default).
When this is done, we should be able to run ssh somehost and have the connection be established, just as if you were connecting directly. One thing to make sure that may be this does not work with all proxies, so it may be a little hit-and-miss, but it should work with Squid and Apache’s mod_proxy module as well as a few other popular implementations.
I hope this will be informative for you :)
Tuesday, September 29, 2009
Downloads with delta RPMs in Fedora-11
Yesterday while doing some goggling I come across through “Delta RPM Packages” in Fedora 11, which is a great new feature: delta RPM updates. This feature creates delta RPM packages (.drpm) that are binary “patches” to the existing RPM packages. What this package does is that it downloads only the changes of the RPM as compare to the existing RPM instead of downloading the full RPM package.
Once the delta RPM is downloaded by the Presto plugin for yum, it will try to reconstruct a full RPM based on the contents of the previous RPM, plus the newly changed files from the delta RPM. Yum will then install the newly-created RPM.
Using Presto has its benefits and drawbacks. If we have a fast Internet connection or are using a local mirror, using Presto doesn’t make sense. It would be faster to download the full RPM package instead of downloading the changed parts and consuming CPU time to reconstruct the RPM to install. You can get detail information about Presto from Fedora Project, Click Here
If, however, we have a slow Internet connection using Presto makes sense: it will download smaller files which will save time, money and resources.
Presto will depends mostly on the update. If it is an update that introduce a single patch that affects only one or two files among multi-megabyte package then using Presto will make the download really fast, if it’s an upgraded version being provided and most files would likely change meaning that many files have changed and been downloaded.
To use Presto, All we need to do is install the yum-presto package, which contains the plugin for Presto:
# yum install yum-presto
Once this is done, we can call to yum using Presto with no further configuration on our part. If you don’t want to use it any more just we have to simply remove the yum-presto-package.
# rpm -e yum-presto
After this in next using yum will act as normal, NOTE: Presto is not the default in Fedora-11 but what look from the application is that it will be the default in Fedora-12.
I Hope this will be informative for you :)
Sunday, September 27, 2009
How to Configure Linux as a Router
It is not possible to purchase Network Router (like Cisco or Juniper) for communication between two different networks on a LAN, although we need router for that in any case, as Router is the device which is used for communication between two different networks. So we should go for economic solution so that it charge us less and also results in proper output.
This can be done by using Linux Machine as a Router, we have some simple steps to do it, using Network Address Translation (NAT).
1. Enable packet forwarding . Make it permanent by adding "net.ipv4.ip_forward = 1" to /etc/sysctl.conf
echo "1" > /proc/sys/net/ipv4/ip_forward
2. Enable iptables to handle NAT. ( eth0 is the public Interface )
/sbin/iptables -t nat -A POSTROUTING -o eth0 -j MASQUERADE
3. Save iptables settings
# service iptables save
4. Done. Check by routing table by verifying "netstat -nr" and iptables rules by "iptables -L"
This is the simplest method and for iptables consult the one and only "GOOGLE".
I hope it will be informative for you :)
Friday, September 11, 2009
IP HourGlass Model
"The Hourglass model is essentially the idea of funnelling all communications through some common, ubiquitous communications protocol. Prominent examples of this common protocol are Internet Protocol (IP) and Asynchronous Transfer Model (ATM) [1]"

The data that is created by an application needs to pass through the layer of the TCP/IP reference model to reach the destination. For Example, The application layer protocol used might be HTTP, FTP or TFTP. Every Application layer protocol is associated with a transport layer protocol depending on wheather it is connection-oriented or connection-less. The transport layer protocol in turn interacts with IP for routing the data packets. It is very important to understand that irrespective of the application layer protocol and the transport layer protocol the only protocol that is used for routing the data packets is IP. When the data transmission through the four layers is visualized it takes the shape of an hourglass and thus the model is called the IP Hourglass Model.
See Figure, When Source-A and Source-B interacts with HTTP so the request is forward to IP and Source-C interacts with IP using UDP and then IP forward or send the data to Network Interfaces say Ethernet or X.25 (creates on the basis of technology used) and then request is recieved by Destination-A, Destination-B and so on.
[1]: www.google.com
I hope this will be informative for You!
Wednesday, September 9, 2009
Some more Beginner Tips - CISCO
When you work on the Cisco Router or Catalyst Switch console, it would be annoying to have the console or terminal (telnet/ssh) logs to pop in between your commands. This can be even more irritating when it is busy switch or a router spitting messages continuously.
We can log the messages to the console without interferring with your work in the console in Cisco IOS by logging synchronous.In Cisco IOS, logging synchronous can allow you to work along with the logs still logging to the console but without disturbing your work.
To do this
Consol:
AUX:
Telnet/SSH:
If your Router/Switch has more vty
Description:
To add a description to an interface configuration, use the description interface configuration command. Use the no form of this command to remove the description.
The description command is meant solely as a comment to be put in the configuration to help you remember what certain interfaces are used for.
The following example shows how to add a description for a T1 interface:
The description "T1 line to How2Pass - 128 Kb/s" appears in the output of the following EXEC commands: show startup-config, show interfaces, and show running-config
I hope it will be informative for You :)
We can log the messages to the console without interferring with your work in the console in Cisco IOS by logging synchronous.In Cisco IOS, logging synchronous can allow you to work along with the logs still logging to the console but without disturbing your work.
To do this
Consol:
Router(config)# line con 0
Router(config-line)# logging synchronous
AUX:
Router(config)# line aux 0
Router(config-line)# logging synchronous
Telnet/SSH:
Router(config)# line vty 0 4
Router(config-line)# logging synchronous
If your Router/Switch has more vty
Router(config)# line vty 5 15
Router(config-line)# logging synchronous
Description:
To add a description to an interface configuration, use the description interface configuration command. Use the no form of this command to remove the description.
The description command is meant solely as a comment to be put in the configuration to help you remember what certain interfaces are used for.
The following example shows how to add a description for a T1 interface:
Router(config)# interface serial 0
Router(config-if)# description T1 line to How2Pass - 128 Kb/s
The description "T1 line to How2Pass - 128 Kb/s" appears in the output of the following EXEC commands: show startup-config, show interfaces, and show running-config
I hope it will be informative for You :)
Description / Line Console 0 / Logging Synchronous
I got an email today from one of my friend from india (we came to know about each other on cisco community on orkut :)
Mr. XYZ
"hi sohail,
how are u ?. I am fine and hope same for u. I have some problem in CCNA. so i am writing this mail..
what is the use of command
line console 0 and why we always should use 0 with this . if u will use this command in a router with a question mark
such as
Router(config) # line console ?
<0-4> first line number
Now this time it has five choices,we can use any number but the output is not coming as we want, I referred CCNA books but i could not get the answer. if it is necessary to use always 0 then why it gives five choices. I am not able to understand.
my second problem is
when i am typing some commands in router configuration mode I am getting some unwanted messages. how to remove these messages . mainly it is coming when we are typing in some commands. I got a answer that was use logging synchronous command, but i don't know how to use this command. and what will be the effect of that command we will get.
my third problem is
how to use description command and why ? "
Ans # 1: Man u r getting it wrong, in router the console command is always <0-0>, this is just usaed to enable the console password and 0 menas the zero level and it is always 0 see attachement with mail, i have attached the router snap short for u, while configuring the passowrd so when u enter there an option is wheather to ask for it r not i mean
no logging OR logging
Ans # 2: We can log the messages to the console without interferring with your work in the console in Cisco IOS by logging synchronous.In Cisco IOS, logging synchronous can allow you to work along with the logs still logging to the console but without disturbing your work.
To do this
Consoole Port:
Router(config)# line con 0
Router(config-line)# logging synchronous
AUX port:
Router(config)# line aux 0
Router(config-line)# logging synchronous
for telent/ssh:
Router(config)# line vty 0 4
Router(config-line)# logging synchronous
If ur switch or router has many vty session
Router(config)# line vty 5 15
Router(config-line)# logging synchronous
or if you want to off then use NO with the commands.
Ans # 3:First why we use description, so description is used to remember the things in the future suppose in very large networks it is not possible all the interface and stuff that belong to whom, so better is to give some description to the interface etc to remember that.
How to use:
# interface serial 0
# description T1 Line to Head Office - 256 Kb/s
Mr. XYZ
"hi sohail,
how are u ?. I am fine and hope same for u. I have some problem in CCNA. so i am writing this mail..
what is the use of command
line console 0 and why we always should use 0 with this . if u will use this command in a router with a question mark
such as
Router(config) # line console ?
<0-4> first line number
Now this time it has five choices,we can use any number but the output is not coming as we want, I referred CCNA books but i could not get the answer. if it is necessary to use always 0 then why it gives five choices. I am not able to understand.
my second problem is
when i am typing some commands in router configuration mode I am getting some unwanted messages. how to remove these messages . mainly it is coming when we are typing in some commands. I got a answer that was use logging synchronous command, but i don't know how to use this command. and what will be the effect of that command we will get.
my third problem is
how to use description command and why ? "
Reply:
Ans # 1: Man u r getting it wrong, in router the console command is always <0-0>, this is just usaed to enable the console password and 0 menas the zero level and it is always 0 see attachement with mail, i have attached the router snap short for u, while configuring the passowrd so when u enter there an option is wheather to ask for it r not i mean
no logging OR logging
Ans # 2: We can log the messages to the console without interferring with your work in the console in Cisco IOS by logging synchronous.In Cisco IOS, logging synchronous can allow you to work along with the logs still logging to the console but without disturbing your work.
To do this
Consoole Port:
Router(config)# line con 0
Router(config-line)# logging synchronous
AUX port:
Router(config)# line aux 0
Router(config-line)# logging synchronous
for telent/ssh:
Router(config)# line vty 0 4
Router(config-line)# logging synchronous
If ur switch or router has many vty session
Router(config)# line vty 5 15
Router(config-line)# logging synchronous
or if you want to off then use NO with the commands.
Ans # 3:First why we use description, so description is used to remember the things in the future suppose in very large networks it is not possible all the interface and stuff that belong to whom, so better is to give some description to the interface etc to remember that.
How to use:
# interface serial 0
# description T1 Line to Head Office - 256 Kb/s
Monday, September 7, 2009
IPS Device Manager (IDM) with HTTPS / SSL / TLS
Intrusion Prevention System (IPS), The device having the ability to detect and stop intruders in the network. IPS can be access through command Line (CLI) and also through web (GUI). The GUI used to access IPS is IDM.
IDM:
A GUI used to manage the IPS allowing a point-N' click way to manage the system. It can be access through web-browser. Different protcol can be used with IDM:
1. TLS / SSL / HTTPS
2. Remote Data Exchnage Protocol (RDEP)
3. Security Device Event Exchange (SDEE)
4. Extended Markup Language (XML)
5. Intrusion Detection Configuration (IDConf)
HTTPS is a secure version of HTTP, its a HTTP over SSL or TLS. TLS or SSL make sure that data send over HTTP is secure and is encrypted. SSL comes out first for secure transaction like banking operations and transactions so we have to use some secure protcol and that was SSL but it was used only for HTTP (web) while we need an alternate also for other than web traffice so TLS was in. TLS can be used for any traffic or any communication type.
When we communicate with IPS, we can use any one of the protocol (TLS, SSL, HTTPS). Once encrypted session is established we can use than any one of the two protocol (RDEP or SDEE) to send configuration using a secure method. Like RDEP is used to configure and then SDEE is used to report event or notify the target.
NOTE: XML created and allow that it can store data, a universal way to store data and information with text, like back in 2000's Microsoft declare that we will now use XML to store data, just like we have our Microsoft office with .x extension (.docx) so All information to sensor will send using XML.
System Requirements:
--> Windows 2000 or XP
--> Sun Sparc Solaris 2.8 or 2.9 or later
--> Red Hat Linux 9.0 w/Gnome or KDE
Browser:
--> Internet Explorer 6.0 or later
--> Netscape 7.1 or later
--> Mozilla 1.7 or later
Java Plug-in 1.5 or later
Login in to IPS using web browser like
Further detail of IPS configurations, Problmes solution will be discussed soon here.
I hope this wille informativ for You :)
IDM:
A GUI used to manage the IPS allowing a point-N' click way to manage the system. It can be access through web-browser. Different protcol can be used with IDM:
1. TLS / SSL / HTTPS
2. Remote Data Exchnage Protocol (RDEP)
3. Security Device Event Exchange (SDEE)
4. Extended Markup Language (XML)
5. Intrusion Detection Configuration (IDConf)
HTTPS is a secure version of HTTP, its a HTTP over SSL or TLS. TLS or SSL make sure that data send over HTTP is secure and is encrypted. SSL comes out first for secure transaction like banking operations and transactions so we have to use some secure protcol and that was SSL but it was used only for HTTP (web) while we need an alternate also for other than web traffice so TLS was in. TLS can be used for any traffic or any communication type.
When we communicate with IPS, we can use any one of the protocol (TLS, SSL, HTTPS). Once encrypted session is established we can use than any one of the two protocol (RDEP or SDEE) to send configuration using a secure method. Like RDEP is used to configure and then SDEE is used to report event or notify the target.
NOTE: XML created and allow that it can store data, a universal way to store data and information with text, like back in 2000's Microsoft declare that we will now use XML to store data, just like we have our Microsoft office with .x extension (.docx) so All information to sensor will send using XML.
System Requirements:
--> Windows 2000 or XP
--> Sun Sparc Solaris 2.8 or 2.9 or later
--> Red Hat Linux 9.0 w/Gnome or KDE
Browser:
--> Internet Explorer 6.0 or later
--> Netscape 7.1 or later
--> Mozilla 1.7 or later
Java Plug-in 1.5 or later
Login in to IPS using web browser like
https://10.1.1.10
Further detail of IPS configurations, Problmes solution will be discussed soon here.
I hope this wille informativ for You :)
Thursday, September 3, 2009
Domain Policy Updation
I was asked by an Network Manager in XYZ-Medical University in Peshawar about a problme in Domain controller that he was facing, he told me:
Network Manager Said:
I am trying to change the password options for my Domain Controller (on Windows Server-2003), like i want to make my password length say 5 character and second i want to remove the passowrd complexity like in windows server 2003 by default you have to give password a combination of character, numbers and special characters (@,# et) now i have done the necessary steps but still its not working, like still for new user, the system is asking for complex password.
So he request me to help me out in this :(
Solution:
After looking for some solution i got the answer and it was so simple, "Actually this is the problme in Windows Server-2003 whenever you make changes in "DOMAIN SECURIT POLICY" & "DOMAIN CONTROOLER SECURITY POLICY" so the changes will not effect until you update the group policy. The detail steps to do this is as under:
Start --> Administrative Tools --> Domain Security policy --> Account Policy --> Password Policy
Then here DISABLE the option "Password must meet the complexity requirement" and define size for "Password minimum Length". Here we have done with the definition now to make the chaages effect, lets look it:
Steps:
1. Go to command prompt
2. Run
3. cmd
4. c:\> gpupdate
or
c:\> gpupdate/force
and it will now work and the MIS Manager also done with the problem.
I hope it will be informative for you :)
Monday, August 31, 2009
Configuration of Cisco Catalyst Express-500 Switch
In this document i will brielfy explain about the initial configuration / pocedure of Cisco Catalyst Express-500 series switches. The information in this document was created from the devices in a specific lab environment in my own office where i am working as i was asked to check this switch and try for all the configurations like VLAN, Ether-channel, Inter-Vlan Routing etc.
Now lets look at the steps to access the switch, Follow the steps in the same order as given to complete the configuration :)
1. Make sure to unplug all device from switch if connected
2. Power the switch
3. Wait for the SETUP LED to blink green
4. Press Setup, A switch port LED begins to blink green
5. When a switch port LED blinks green, connect your PC to that port (normally FastEthernet 0/1)
The LAN adapter of this PC (attached to the switch) must be configured to get the IP address via DHCP. The LEDs on the PC and the switchport blink green while the switch configures the connection (this takes around one minute)
6. Open a web browser, access your switch through IP and it should display the GUI, if not display then follow the followinf steps
a. Issue the ipconfig command in order to view the dynamic address allocation.

The switch configures its management address as the Default Gateway for the LAN adapter card of the PC.
Note: For Cisco IOS Software FY series releases, the management IP address is 10.0.0.1. For Cisco IOS Software SEG series releases, the IP address is 169.254.0.1: "Source is cisco.com for this note"
b. From the browser, go to the mentioned IP address. For example, http://10.0.0.1
7. Enter the Network Settings and Optional Settings (if required). Click Submit in order to save changes and finish the basic configuration.

8. Enter the configured User Name and Password in order to continue the configuration of the switch.

9. Then it will ask you for configuration of smart port, so just click on "no thanks"
10. In last it will display a prompt "Restart the switch with its current settings" and "Reset the switch to its factory default, and then restart the switch", so select the first option "Restart the switch with its current settings" and press "submit".
11. Close the web browser and reconfigure the LAN adapter with an IP address within the same subnet of the new management address of the switch.
12. When the switch restart, open a web browser and go to http://CE-500_Management_IP_Address, For example, http://172.16.100.100
I hope it will be informative for you :)
Sunday, August 23, 2009
DMVPN - EIGRP, Disable Split-Horizon
I was ask to tell the solution for the following question regarding DMVPN.
Q: I am deploying a DMVPN hub and spokes with mGRE tunnels protected by IPSEC. I activated EIGRP on it, and I noticed that on the spoke EIGRP
installs in its routing table only the route to the hub, while the spoke-to-spoke routes don't appear neither in the routing table, neither in the EIGRP topology. Nevertheless, the spokes communicate between them through the dynamic tunnels.
I couldn't find any Cisco document contemplating the issue. I wonder if this is the way it's supposed to work, or if I have to search for some misconfiguration.
Solution:
There are certain rules which we have to remember while configuring DMVPN with EIGRP, One of these rules is split horizon. The DMVPN hub tunnel interface serves multiple spokes. Also the tunnel ip address is on the same subnet as its spokes. When configuring a EIGRP AS you use the tunnel network id as a network you want to participate on with EIGRP.
Split Horizon was designed to not allow a router to advertise a route out the same interface in which the route was originally learned. This conflicts in the case of the tunnel interface because it needs to be able to make neighbors with the spokes on the same subnet and also re-advertise routes learned from one spoke to the next.
Again, If you dont disable split horizon on the tunnel interface you will only see the routes the hub itself is responsible for from a spoke router. This can be done by a single command under tunnel interface.
Now you can see all routes in the client routing table.
Cheers :)
Q: I am deploying a DMVPN hub and spokes with mGRE tunnels protected by IPSEC. I activated EIGRP on it, and I noticed that on the spoke EIGRP
installs in its routing table only the route to the hub, while the spoke-to-spoke routes don't appear neither in the routing table, neither in the EIGRP topology. Nevertheless, the spokes communicate between them through the dynamic tunnels.
I couldn't find any Cisco document contemplating the issue. I wonder if this is the way it's supposed to work, or if I have to search for some misconfiguration.
Solution:
There are certain rules which we have to remember while configuring DMVPN with EIGRP, One of these rules is split horizon. The DMVPN hub tunnel interface serves multiple spokes. Also the tunnel ip address is on the same subnet as its spokes. When configuring a EIGRP AS you use the tunnel network id as a network you want to participate on with EIGRP.
Split Horizon was designed to not allow a router to advertise a route out the same interface in which the route was originally learned. This conflicts in the case of the tunnel interface because it needs to be able to make neighbors with the spokes on the same subnet and also re-advertise routes learned from one spoke to the next.
Again, If you dont disable split horizon on the tunnel interface you will only see the routes the hub itself is responsible for from a spoke router. This can be done by a single command under tunnel interface.
# no ip split-horizon eigrp 2
Now you can see all routes in the client routing table.
Cheers :)
Tuesday, August 18, 2009
GRE/IPSEC and IPSEC VPN tunnels
GRE is used as a it provides pure tunneling see GRE for full information. To make secure the GRE tunneling we use GRE/IPSec or IPSec VPN tunnel, as it is one way of setting up private site-to-site connection by utilizing public network (the Internet). Since it is utilizing public network, there would be no need to have dedicated physical circuit to interconnect the sites, hence requiring low overhead to setup while maintain private and secure connection.
With site-to-site IPSec VPN, there is a IP routing in place to interconnect multiple subnet. This IP routing could be static routing or dynamic routing. In a small network where there is only one path connecting two sites, then static routing should be sufficient. When there are multiple paths connecting two sites, then dynamic routing (i.e. EIGRP, OSPF) should be used to have optimal connection just like i did for our office as we have multiple sites to connect and communicate so we used dynamic routing (EIGRP) although we use DMVPN (i will talk about it in next blogs).
Note that IPSec tunneling technology is only able to support static routes and basic IP interconnection. When there are more advance IP interconnections needed, such as running Novell IPX, dynamic routing, and load balancing between the sites, then IPSec tunneling itself is unable to support. For such advance IP interconnections, GRE tunneling is the choice. The downside of GRE tunneling is that GRE tunnel is less-secure tunnel compared to IPSec tunnel.
As we use dynamic routing and decided to use public network and also want to have a secure connection, so the workaround is to run GRE over IPSec. IPSec will then be encrypting the GRE tunnel securely and GRE tunnel will be providing the advance IP interconnection support. The Header will look like this (Rough sketch form me sorry for so simple :(

For the detail configuration of GRE and VPN look at my blogs.
I hope this will be informative for you.
Cheers :)
GRE Tunnels
GRE stands for "Generic Routing Encapsulation". GRE is now industry tunneling method used to create a logical "TUNNEL" interface. It is designed to work with logical protocols, only GRE is completely non-secure as we have no concept of crypto-map. This makes a seperate network over the network, but now they add an IP header in the GRE header so makes it secure and provides a perfect tunneling. I will talk about GRE tunneling here, lets look at the configurations of GRE.

Run EIGRP on both sides
Now to create tunnel on both side lets look at the configurations
At this point for simplicty define static route on Router-A and check the connectivity
It will shows you that the route is learned via Tunnel.
I Hope this will be informative for You !
Cheers :)

Run EIGRP on both sides
ReedWood(config) # router eigrp 1
ReedWood(config-router) # network 10.0.0.0
ReedWood(config-router) # network 41.0.0.0
PineWood(config) # router eigrp 1
PineWood(config-router) # network 10.0.0.0
PineWood(config-router) # network 41.0.0.0
Now to create tunnel on both side lets look at the configurations
ReedWood(config) # interface tunnel 0
# ip address 10.5.1.2 255.255.255.0
# tunnel source 0/0
# tunnel destination 41.95.110.2
# tunnel mode gre ip
PineWood(config) # interface tunnel 0
# ip address 10.5.1.1 255.255.255.0
# tunnel source 0/0
# tunnel destination 41.95.110.1
# tunnel mode gre ip
At this point for simplicty define static route on Router-A and check the connectivity
Router-A (config) # ip route 0.0.0.0 0.0.0.0
PineWood # show ip eigrp neighbor
It will shows you that the route is learned via Tunnel.
I Hope this will be informative for You !
Cheers :)
Wednesday, August 12, 2009
VPN Site-to-Site CLI Configuration
We are going to configure site-to-site VPN (site-to-site) between head office (Lahore) and our regional office (Peshawar), so here i am going to briefly discuss VPN i.e

1. How VPN are established
2. Configuring IKE Phase-1 parameters
3. Configuring IKE Phase-2 parameters
4. Configuring Interesting Traffic
5. CLI configuration
Cisco Router Perspective of VPN Connection
1. The routers recieve traffic considered "WORTHY" of establishing a VPN connection.
2. IKE Phase-1 negotiated, security association (SA) established.
3. IKE Phase-2 negotiated, security association established.
4. Data tranmitted through IPSec tunnel.
5. Once transmission complete, IPSec tunnel turn down (If you configure Time).
**: After 24-hours it can re-negotiated session key
**: After certain amount of data can re-negotiate the key.
Configuration:
1. Set up ISKAMP Policy (IKE Phase-1)
2. Set up IPSec Transform set (IKE Phase-2)
3. Define Interesting Traffic
4. Set up Crypto Map
5. Assign Crypto Map to Interface
Note: This is not Permit or Deny ACL, this means encrypt this traffic.
Head office configuration:
And same configuration is required on the other side with just a bit of changes, lets c
I used group-2 in my configuration, actually we have different diffie helmin groups like group-1 is less processor intensive but encryptio is weak (768-bit), group-2 is processor intensive but provides high bit encryption (1024-bit) and group-5 provides even more (1536-bit) encryption. so it depends on you which ever group you are using.
I hope this will be informative for You :)
Any suggestion and comments will be highly appreciated.
Cheers :)

1. How VPN are established
2. Configuring IKE Phase-1 parameters
3. Configuring IKE Phase-2 parameters
4. Configuring Interesting Traffic
5. CLI configuration
Cisco Router Perspective of VPN Connection
1. The routers recieve traffic considered "WORTHY" of establishing a VPN connection.
2. IKE Phase-1 negotiated, security association (SA) established.
3. IKE Phase-2 negotiated, security association established.
4. Data tranmitted through IPSec tunnel.
5. Once transmission complete, IPSec tunnel turn down (If you configure Time).
**: After 24-hours it can re-negotiated session key
**: After certain amount of data can re-negotiate the key.
Configuration:
1. Set up ISKAMP Policy (IKE Phase-1)
2. Set up IPSec Transform set (IKE Phase-2)
3. Define Interesting Traffic
4. Set up Crypto Map
5. Assign Crypto Map to Interface
PSH-Router(config) # crypto isakmp policy 50
PSH-Router(config-isakmp) # authentication pre-share
PSH-Router(config-isakmp) # encryption aes 128
PSH-Router(config-isakmp) # group 2
PSH-Router(config-isakmp) # hash sha
PSH-Router(config-isakmp) # lifetime 5000
PSH-Router(config-isakmp) #exit
PSH-Router(config) # crypto isakmp key 0 cisco address 71.209.254.34
PSH-Router(config) # crypto ipsec transform-set DEMO esp-aes 128 esp-sha-hmac
PSH-Router(cfg-crypto-trans) #
PSH-Router(config) # ip access-list extended INT_TRAFFIC
PSH-Router(config-ext-nacl) # permit ip 172.30.0.0 0.0.255.255 192.168.1.0 0.0.0.255
PSH-Router(config-ext-nacl) # exit
Note: This is not Permit or Deny ACL, this means encrypt this traffic.
PSH-Router(config) # crypto map VPN_MAP 10 ipsec-isakmp
PSH-Router(config-crypto-map) # set peer 71.209.254.34
PSH-Router(config-crypto-map) # match address INT_TRAFFIC
PSH-Router(config-crypto-map) # set transform-set DEMO
PSH-Router(config) # interface fastethernet 0/1
PSH-Router(config-if) # crypto map VPN_MAP
Head office configuration:
And same configuration is required on the other side with just a bit of changes, lets c
Head-Office(config) # crypto isakmp policy 50
Head-Office(config-isakmp) # authentication pre-share
Head-Office(config-isakmp) # encryption aes 128
Head-Office(config-isakmp) # group 2
Head-Office(config-isakmp) # hash sha
Head-Office(config-isakmp) # lifetime 5000
Head-Office(config-isakmp) #exit
Head-Office(config) # crypto isakmp key 0 cisco address 130.13.140.129
Head-Office(config) # crypto ipsec transform-set DEMO esp-aes 128 esp-sha-hmac
Head-Office(cfg-crypto-trans) #
Head-Office(config) # ip access-list extended INT_TRAFFIC
Head-Office(config-ext-nacl) # permit ip 192.168.1.0 0.0.0.255 172.30.0.0 0.0.255.255
Head-Office(config-ext-nacl) # exit
Head-Office(config) # crypto map VPN_MAP 10 ipsec-isakmp
Head-Office(config-crypto-map) # set peer 130.13.140.129
Head-Office(config-crypto-map) # match address INT_TRAFFIC
Head-Office(config-crypto-map) # set transform-set DEMO
Head-Office(config) # interface fastethernet 0/4
Head-Office(config-if) # crypto map VPN_MAP
I used group-2 in my configuration, actually we have different diffie helmin groups like group-1 is less processor intensive but encryptio is weak (768-bit), group-2 is processor intensive but provides high bit encryption (1024-bit) and group-5 provides even more (1536-bit) encryption. so it depends on you which ever group you are using.
I hope this will be informative for You :)
Any suggestion and comments will be highly appreciated.
Cheers :)
Tuesday, August 11, 2009
Understanding the IOS File Name Convention
As a network guy we should know about the naming convention of the IOS file name, which is usually similar to this form:
xxxx-yyy-ww.aaa-bb.bin
1. The xxxx is the platform, For example,
c1005 – For 1005 platform
c1600 – For 1600 platform
c1700 – For 1700, 1720, and 1750 platforms
c2500 – For 25xx, 3xxx, 5100, and AO (11.2 and later only) platforms
c2600 – For 2600 platform
c2800 – For Catalyst 2800 platform
c2900 – For 2910 and 2950 platforms
c3620 – For 3620 platform
c3640 – For 3640 platform
c4000 – For 4000 platform (11.2 and later only)
c4500 – For 4500 and 4700 platforms
2. The yyy is the feature set. For example,
b For Apple talk support
boot For boot image
c For CommServer lite (CiscoPro)
drag For IOS based diagnostic image
g For ISDN subset (SNMP, IP, Bridging, ISDN, PPP, IPX, and AppleTalk)
i For IP sebset (SNMP, IP, Bridging, WAN, Remote Node, and Terminal Services)
n For IPX support
q For asynchronous support
t For Telco return (12.0)
y For reduced IP (SNMP, IP RIP/IGRP/EIGRP, Bridging, ISDN, and PPP) (c1003 or c1004)
z For managed modems
40 For 40 bit encryption
50 For 50 bit encryption
3. The ww is for the format (where the IOS file runs in the router)
f For flash
m For RAM
r For ROM
l For the image will be relocated at run time
The file might also be compressed. The following letters denote the compression type,
z For zip compression
x For mzip compression
w For “STAC” compression
aaa-bb represent the version of the IOS. It is usually read like this “Version aa.a(bb)”. The last part of the IOS file name might contain letters like T (new feature release identifier), S (individual release number), or XR (modular packages).
Monday, August 10, 2009
Add a login banner to your Cisco router
I seen many people who just use banner for some welcome messages and stuff like that but we can use it in many usefull manners say like when i telnet or ssh so it should display me some warning message like "Unauthorized Access prohibited", say may be we want to display password if we changed that and let want the second shift administrator to know about it etc or we can also use it like to display the hostname, domain name etc so here is a small view of it, have a look :)
The syntax of banner is as follow:
where {char} is a special delimeter character that does not exist in the {banner text}. Everything contained between the first and second {char} characters, including carriage returns, is interpreted as the banner message. For example,
******************************************
* Unauthorized access prohibited
******************************************
OR we can have this in some more detail like as shoen
-------------------------------------------
Unauhorized Access Prohibited
-------------------------------------------
You have access $(hostname).$(domain)
You are accessing line $(line)
-------------------------------------------
Unauhorized Access Prohibited
-------------------------------------------
The output of the banner is as:

I hope it will be informative for you :)
The syntax of banner is as follow:
PSH-DXX (config) # banner motd {char} {banner text} {char}
where {char} is a special delimeter character that does not exist in the {banner text}. Everything contained between the first and second {char} characters, including carriage returns, is interpreted as the banner message. For example,
PSH-DXX (config)# banner motd #
******************************************
* Unauthorized access prohibited
******************************************
#
OR we can have this in some more detail like as shoen
PSH-DXX (config)# banner motd #
-------------------------------------------
Unauhorized Access Prohibited
-------------------------------------------
You have access $(hostname).$(domain)
You are accessing line $(line)
-------------------------------------------
Unauhorized Access Prohibited
-------------------------------------------
The output of the banner is as:

I hope it will be informative for you :)
Sunday, August 9, 2009
openssl command-line program
The openssl command can be used to create digests of a file, which can be used to verify that a file has not been tampered with:
MD5(foo.txt)= b05403212c66bdc8ccc597fedf6cd5fe
SHA1(foo.txt)= 0181d93fee60b818e3f92e470ea97a2aff4ca56a
To view the other message digests that can be used, look at the output of openssl list-message-digest-commands.
You can also use openssl to encrypt files. To view the list of available ciphers, use openssl list-cipher-commands. Once you’ve chosen a cipher to use, you can encrypt the file using the following commands:
enter aes-256-cbc encryption password:
Verifying - enter aes-256-cbc encryption password:
foo.enc: data
Salted__yvi{!e????i"Yt?;(Ѱ e%
enter aes-256-cbc decryption password:
test file
In the above example, the file foo.txt was encrypted using 256-bit AES in CBC mode, the encrypted copy being saved as the file foo.enc. Looking at the contents of the file provide gibberish. Decrypting the file is done using the -d option, however keep in mind that not only do you need to remember the password, you also need to know the cipher used.
I hope it will help You :)
$ echo "test file"> foo.txt
$ openssl dgst -md5 foo.txt
MD5(foo.txt)= b05403212c66bdc8ccc597fedf6cd5fe
$ openssl dgst -sha1 foo.txt
SHA1(foo.txt)= 0181d93fee60b818e3f92e470ea97a2aff4ca56a
To view the other message digests that can be used, look at the output of openssl list-message-digest-commands.
You can also use openssl to encrypt files. To view the list of available ciphers, use openssl list-cipher-commands. Once you’ve chosen a cipher to use, you can encrypt the file using the following commands:
$ openssl enc -aes-256-cbc -salt -in foo.txt -out foo.enc
enter aes-256-cbc encryption password:
Verifying - enter aes-256-cbc encryption password:
$ file foo.enc
foo.enc: data
$ cat foo.enc
Salted__yvi{!e????i"Yt?;(Ѱ e%
$ openssl enc -d -aes-256-cbc -in foo.enc
enter aes-256-cbc decryption password:
test file
In the above example, the file foo.txt was encrypted using 256-bit AES in CBC mode, the encrypted copy being saved as the file foo.enc. Looking at the contents of the file provide gibberish. Decrypting the file is done using the -d option, however keep in mind that not only do you need to remember the password, you also need to know the cipher used.
I hope it will help You :)
Saturday, August 8, 2009
Periodical Configuration Save of Cisco Devices
Periodical configuration save of Cisco devices can be done from inside the device by using a combination of "kron" and "archive" commands. As we had no routine of taking backup of our router but yesterday after a long search now i have successfully configured all stuff like backup, monitoring my router through Nipper (see my full blog on it, click Nipper), Now i will take my backup and will save at remote place :).
Define the location of your configuration save apart from the default Flash location. Based on your IOS support, this can be a HTTP, HTTPS, FTP, or TFTP path. I am taking the backup using tftp.
The following commands is used to enable archive and define the path, while third command is used that when ever someone copy configuration to NVRAM so it will take backup also.
If you want to suppress the display of password information in configuration log files, use the hidekeys command in configuration change logger configuration mode. or To allow the display of password information in configuration log files, use the no form of this command
To enable the logging of configuration changes, use the logging enable command in configuration change logger configuration mode. To disable the logging of configuration changes, use the no form of this command.
To specify the maximum number of entries retained in the configuration log, use the logging size command in configuration change logger configuration mode. By default value is 100. To reset the default value, use the no form of this command.
2. KRON
Define the policy list for the scheduler. The following is calling the "write config" command which will trigger the copy over network from the above:
Define the schedule of the policy. The following example is for ten minutes past evening, everyday:
Note: Every time the "write memory" command is issued, the device will trigger a network copy to the path specified above.
I hope this will be informative for you. :)
Cheers :)
Define the location of your configuration save apart from the default Flash location. Based on your IOS support, this can be a HTTP, HTTPS, FTP, or TFTP path. I am taking the backup using tftp.
The following commands is used to enable archive and define the path, while third command is used that when ever someone copy configuration to NVRAM so it will take backup also.
PSW-DXX (config) # archive
PSW-DXX (config-archive)# path tftp://10.110.1.22/
PSW-DXX(config-archive) # write-memory
If you want to suppress the display of password information in configuration log files, use the hidekeys command in configuration change logger configuration mode. or To allow the display of password information in configuration log files, use the no form of this command
PSW-DXX (config)# archive
PSW-DXX (config-archive)# log config
PSW-DXX (config-archive-log-cfg)# hidekeys or no hidekeys
PSW-DXX (config-archive-log-cfg)# exit
To enable the logging of configuration changes, use the logging enable command in configuration change logger configuration mode. To disable the logging of configuration changes, use the no form of this command.
PSW-DXX (config-archive-log-cfg)# logging enable
or
PSW-DXX (config-archive-log-cfg)# no logging enable
To specify the maximum number of entries retained in the configuration log, use the logging size command in configuration change logger configuration mode. By default value is 100. To reset the default value, use the no form of this command.
PSW-DXX (config-archive-log-cfg)# logging size 200
2. KRON
Define the policy list for the scheduler. The following is calling the "write config" command which will trigger the copy over network from the above:
PSW-DXX (config) # kron policy-list backup-config
PSW-DXX (config-kron-policy) # cli write memory
Define the schedule of the policy. The following example is for ten minutes past evening, everyday:
PSW-DXX (config) # kron occurrence daily-config-backup at 05:10 recurring
PSW-DXX (config-kron-occurrence) # policy-list backup-config
Note: Every time the "write memory" command is issued, the device will trigger a network copy to the path specified above.
I hope this will be informative for you. :)
Cheers :)
Friday, August 7, 2009
Audit your Cisco router's security with Nipper
While recently googling on a net, I learned about Nipper. Although there are many security tools that i studied which is used to perform security audits of network devices, but i found Nipper unique, so i configure this on our office (SNGPL) production router.
What is Nipper (Network Infrastructure Parser), Nipper is an open source network devices security auditing tool. One benefit of being open source is that it’s free :)Previously known as CiscoParse, Nipper isn’t especially polished, but it is very functional. It was easy to install and easy to use.
Even more impressive :) is that it works with many different types of network devices (and not just Cisco). Here’s a list of compatible network devices that Nipper can audit:
Cisco switches (IOS)
Cisco routers (IOS)
Cisco firewalls (PIX, ASA, FWSM)
Cisco Catalyst switches (NMP, CatOS, IOS)
Cisco Content Service Switches (CSS)
Juniper NetScreen Firewalls (ScreenOS)
How to use NIPPER ?
Nipper supports a lot of devices and provides many options, so I here i can’t possibly demonstrate all those options. what i do is to show you the basic demonstration. For our example, we’ll use Nipper to audit a Cisco router that has only the default configuration.
To begin, I took a Cisco 1841 router. First, download Nipper from SourceForge.net it’s available for both Windows and Linux. Extract it to a folder on your local PC; let’s call it C:\nipper as i have done like this.
Next, obtain a text version of the router’s configuration file. Telnet or SSH to the router, use the show running-configuration command, copy and paste the output into Notepad, and save it to your local PC in the aforementioned C:\nipper directory.
Alternatively, you can use a TFTP server and copy the configuration to your local PC. For example, I tried this using Tftpd32.exe, and it was both quick and easy. Use the following command to copy the file if some one don't know how to do :)
Once you have the running configuration that you want to audit on your PC, go to the Windows command prompt, and CD into the Nipper directory. Run the following, as shown in Figure A:
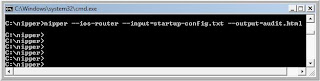
The system will immediately return you to the command prompt without providing any information. But don’t worry — it worked.
Next, open a Web browser and enter this URL: c:\nipper\audit.html. This will take you to the security report. Figure B offers a screenshot of the audit.
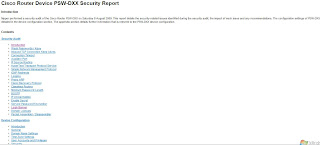
What does Nipper tell you?
Scrolling through this report, you’ll see that Nipper provides security audit information such as:
1. A software version that has vulnerabilities and the reference numbers for those vulnerabilities
2. Recommendations to disable services that might cause others to be able to access the router
3. Commands that you need to enable to secure the router
For our example, Nipper told us that we need to do the following:
a): Upgrade the router’s IOS needs to prevent vulnerability to a Telnet remote DoS attack and a TCP listener DoS attack.
b): Configure the service tcp-keepalives-in command to help prevent a DoS attack.
c): Configure timeouts on consoles to prevent anyone from gaining access to the router from a Telnet or console session.
d): Configure the HTTP service as secure with HTTPS, and enable authentication.
Enable logging.
In addition to several other recommendations, Nipper provided a summary of the device’s configuration — what services are turned on or off, status of the lines, status of the interfaces, DNS, time zone, and more. Check out the actual report from our example.
Considering that it’s so small, simple, and free, Nipper is an amazingly powerful network device security auditing tool. For help with Nipper, run the C:\nipper\nipper -help command at the command prompt after you’ve downloaded, extracted, run the program.
I hope it will be informative for you as i found it very useful :)
Enjoy!
What is Nipper (Network Infrastructure Parser), Nipper is an open source network devices security auditing tool. One benefit of being open source is that it’s free :)Previously known as CiscoParse, Nipper isn’t especially polished, but it is very functional. It was easy to install and easy to use.
Even more impressive :) is that it works with many different types of network devices (and not just Cisco). Here’s a list of compatible network devices that Nipper can audit:
Cisco switches (IOS)
Cisco routers (IOS)
Cisco firewalls (PIX, ASA, FWSM)
Cisco Catalyst switches (NMP, CatOS, IOS)
Cisco Content Service Switches (CSS)
Juniper NetScreen Firewalls (ScreenOS)
How to use NIPPER ?
Nipper supports a lot of devices and provides many options, so I here i can’t possibly demonstrate all those options. what i do is to show you the basic demonstration. For our example, we’ll use Nipper to audit a Cisco router that has only the default configuration.
To begin, I took a Cisco 1841 router. First, download Nipper from SourceForge.net it’s available for both Windows and Linux. Extract it to a folder on your local PC; let’s call it C:\nipper as i have done like this.
Next, obtain a text version of the router’s configuration file. Telnet or SSH to the router, use the show running-configuration command, copy and paste the output into Notepad, and save it to your local PC in the aforementioned C:\nipper directory.
Alternatively, you can use a TFTP server and copy the configuration to your local PC. For example, I tried this using Tftpd32.exe, and it was both quick and easy. Use the following command to copy the file if some one don't know how to do :)
PSW-DXX # copy startup-config tftp:
Address or name of Remote Host: 10.110.1.22
Destination filename[startup-config] yes
!!!!!!!!!!!!!!!!!!!!!!!!!!!!!!!!!!!!!!!!!!!!!!!!!!!!!!!!! OK :)
Once you have the running configuration that you want to audit on your PC, go to the Windows command prompt, and CD into the Nipper directory. Run the following, as shown in Figure A:

C:\nipper> nipper --ios-router --input=startup-config.txt --output=audit.html
The system will immediately return you to the command prompt without providing any information. But don’t worry — it worked.
Next, open a Web browser and enter this URL: c:\nipper\audit.html. This will take you to the security report. Figure B offers a screenshot of the audit.

What does Nipper tell you?
Scrolling through this report, you’ll see that Nipper provides security audit information such as:
1. A software version that has vulnerabilities and the reference numbers for those vulnerabilities
2. Recommendations to disable services that might cause others to be able to access the router
3. Commands that you need to enable to secure the router
For our example, Nipper told us that we need to do the following:
a): Upgrade the router’s IOS needs to prevent vulnerability to a Telnet remote DoS attack and a TCP listener DoS attack.
b): Configure the service tcp-keepalives-in command to help prevent a DoS attack.
c): Configure timeouts on consoles to prevent anyone from gaining access to the router from a Telnet or console session.
d): Configure the HTTP service as secure with HTTPS, and enable authentication.
Enable logging.
In addition to several other recommendations, Nipper provided a summary of the device’s configuration — what services are turned on or off, status of the lines, status of the interfaces, DNS, time zone, and more. Check out the actual report from our example.
Considering that it’s so small, simple, and free, Nipper is an amazingly powerful network device security auditing tool. For help with Nipper, run the C:\nipper\nipper -help command at the command prompt after you’ve downloaded, extracted, run the program.
I hope it will be informative for you as i found it very useful :)
Enjoy!
10 commands you should master when working with the Cisco IOS
The Cisco IOS provides thousands of commands, and configuring it can be challenging. Here are 10 commands that we should need to know while using the Cisco IOS.
1: " ? " (Help):
The "?", It may seem entirely too obvious that you should know how to type ? to ask for help when using the Cisco IOS. However, the Cisco IOS is completely different from other operating systems when it comes to using the question mark (help key). As the IOS is a command-line operating system with thousands of possible commands and parameters, using the ? can save our day.
We can use the command in many ways. First, use it when you don’t know what command to type. For example, type ? at the command line for a list of all possible commands. we can also use ? when we don’t know what a command’s next parameter should be. For example, you might type show ip ? If the router requires no other parameters for the command, the router will offer cr (carrige return) means it is the only available option. Finally, use ? to see all commands that start with a particular letter. For example, show c? will return a list of commands that start with the letter c.
2: show running-configuration
The show running-config command shows the router, switch, or firewall’s current configuration. The running-configuration is the config that is in the router’s memory. You change this config when you make changes to the router. Keep in mind that config is not saved until you do a copy running-configuration startup-configuration. The shortcut for this command is sh run.
3: Save Configuration
This command will save the configuration that is currently being modified (in RAM), also known as the running-configuration, to the nonvolatile RAM (NVRAM). If the power is lost, the NVRAM will preserve this configuration. In other words, if you edit the router’s configuration, don’t use this command and reboot the router–those changes will be lost (if you want to do so). This command can be abbreviated copy run start. The copy command can also be used to copy the running or startup configuration from the router to a TFTP server in case something happens to the router.
4: show interface
The show interface command displays the status of the router’s interfaces. Among other things, this output provides the following:
Interface status (up/down)
Protocol status on the interface
Utilization
Bandwidth
Errors
Delay
MTU
This command is essential for troubleshooting a router or switch. It can also be used by specifying a certain interface, like sh int fa0/0.
or for specific interface
5: show ip interface
Even more popular than show interface are show ip interface and show ip interface brief. The show ip interface command provides tons of useful information about the configuration and status of the IP protocol and its services, on all interfaces. The show ip interface brief command provides a quick status of the interfaces on the router, including their IP address, Layer 2 status, and Layer 3 status.
6: config terminal, enable, interface, and router
Cisco routers have different modes where only certain things can be shown or certain things can be changed. Being able to move between these modes is critical to successfully configuring the router.
For example, when logging in, you start off at the user mode (where the prompt looks like >). From there, you type enable to move to privileged mode (where the prompt looks like #). In privileged mode, you can show anything but not make changes. Next, type config terminal (or config t) to go to global configuration mode (where the prompt looks like router(config)# ). From here, you can change global parameters. To change a parameter on an interface (like the IP address), go to interface configuration mode with the interface command (where the prompt looks like router(config-if)#). Also from the global configuration mode, you can go into router configuration using the router {protocol} command. To exit from a mode, type exit.
7: no shutdown
The no shutdown command enables an interface (brings it up). This command must be used in interface configuration mode. It is useful for new interfaces and for troubleshooting. When you’re having trouble with an interface, you may want to try a shut and no shut. Of course, to bring the interface down, reverse the command and just say shutdown. This command can be abbreviated no shut.
8: show ip route
The show ip route command is used to show the router’s routing table. This is the list of all networks that the router can reach, their metric (the router’s preference for them), and how to get there. This command can be abbreviated sh ip route and can have parameters after it, like shiproospf for all OSPF routers. To clear the routing table of all routes, you do clear ip route *. To clear it of just one route, do clear ip route 1.1.1.1 for clearing out that particular network.
9: show version
The show version command gives you the router’s configuration register (essentially, the router’s firmware settings for booting up), the last time the router was booted, the version of the IOS, the name of the IOS file, the model of the router, and the router’s amount of RAM and Flash. This command can be abbreviated shver.
10: debug
The debug command has many options and does not work by itself. It provides detailed debugging output on a certain application, protocol, or service. For example, debug ip route will tell you every time a router is added to or removed from the router.
I hope it will be informative for you :)
1: " ? " (Help):
The "?", It may seem entirely too obvious that you should know how to type ? to ask for help when using the Cisco IOS. However, the Cisco IOS is completely different from other operating systems when it comes to using the question mark (help key). As the IOS is a command-line operating system with thousands of possible commands and parameters, using the ? can save our day.
We can use the command in many ways. First, use it when you don’t know what command to type. For example, type ? at the command line for a list of all possible commands. we can also use ? when we don’t know what a command’s next parameter should be. For example, you might type show ip ? If the router requires no other parameters for the command, the router will offer cr (carrige return) means it is the only available option. Finally, use ? to see all commands that start with a particular letter. For example, show c? will return a list of commands that start with the letter c.
2: show running-configuration
The show running-config command shows the router, switch, or firewall’s current configuration. The running-configuration is the config that is in the router’s memory. You change this config when you make changes to the router. Keep in mind that config is not saved until you do a copy running-configuration startup-configuration. The shortcut for this command is sh run.
3: Save Configuration
This command will save the configuration that is currently being modified (in RAM), also known as the running-configuration, to the nonvolatile RAM (NVRAM). If the power is lost, the NVRAM will preserve this configuration. In other words, if you edit the router’s configuration, don’t use this command and reboot the router–those changes will be lost (if you want to do so). This command can be abbreviated copy run start. The copy command can also be used to copy the running or startup configuration from the router to a TFTP server in case something happens to the router.
Router # copy running-configuration startup-configuration
4: show interface
The show interface command displays the status of the router’s interfaces. Among other things, this output provides the following:
Interface status (up/down)
Protocol status on the interface
Utilization
Bandwidth
Errors
Delay
MTU
This command is essential for troubleshooting a router or switch. It can also be used by specifying a certain interface, like sh int fa0/0.
Router # show interface
or for specific interface
Router # show interface fastethernet 0/0
5: show ip interface
Even more popular than show interface are show ip interface and show ip interface brief. The show ip interface command provides tons of useful information about the configuration and status of the IP protocol and its services, on all interfaces. The show ip interface brief command provides a quick status of the interfaces on the router, including their IP address, Layer 2 status, and Layer 3 status.
6: config terminal, enable, interface, and router
Cisco routers have different modes where only certain things can be shown or certain things can be changed. Being able to move between these modes is critical to successfully configuring the router.
For example, when logging in, you start off at the user mode (where the prompt looks like >). From there, you type enable to move to privileged mode (where the prompt looks like #). In privileged mode, you can show anything but not make changes. Next, type config terminal (or config t) to go to global configuration mode (where the prompt looks like router(config)# ). From here, you can change global parameters. To change a parameter on an interface (like the IP address), go to interface configuration mode with the interface command (where the prompt looks like router(config-if)#). Also from the global configuration mode, you can go into router configuration using the router {protocol} command. To exit from a mode, type exit.
Router >
Router >enable.............Router #
Router # configure terminal ......... Router (config) #
Router (config) # interface fasethernet 0/0
Router (config-if) #
7: no shutdown
The no shutdown command enables an interface (brings it up). This command must be used in interface configuration mode. It is useful for new interfaces and for troubleshooting. When you’re having trouble with an interface, you may want to try a shut and no shut. Of course, to bring the interface down, reverse the command and just say shutdown. This command can be abbreviated no shut.
8: show ip route
The show ip route command is used to show the router’s routing table. This is the list of all networks that the router can reach, their metric (the router’s preference for them), and how to get there. This command can be abbreviated sh ip route and can have parameters after it, like shiproospf for all OSPF routers. To clear the routing table of all routes, you do clear ip route *. To clear it of just one route, do clear ip route 1.1.1.1 for clearing out that particular network.
Router # show ip route
9: show version
The show version command gives you the router’s configuration register (essentially, the router’s firmware settings for booting up), the last time the router was booted, the version of the IOS, the name of the IOS file, the model of the router, and the router’s amount of RAM and Flash. This command can be abbreviated shver.
10: debug
The debug command has many options and does not work by itself. It provides detailed debugging output on a certain application, protocol, or service. For example, debug ip route will tell you every time a router is added to or removed from the router.
Router # debug interface serial 0/1/0
I hope it will be informative for you :)
Thursday, August 6, 2009
Cisco HDLC (Why called Cisco HDLC ?)
High-level Data Link Control, a layer-2 (data-link layer) transmission protocol. The HDLC protocol embeds information in a data frame that allows devices to control data flow and correct errors. For any HDLC communications session, one station is designated primary and the other secondary. A session can use one of the following connection modes, which determine how the primary and secondary stations interact.
Normal unbalanced: The secondary station responds only to the primary station.
Asynchronous: The secondary station can initiate a message.
Asynchronous balanced: Both stations send and receive over its part of a duplex line. This mode is used for X.25 packet-switching networks.
The Link Access Procedure-Balanced (LAP-B) and Link Access Procedure D-channel (LAP-D) protocols are subsets of HDLC.
Q: Now question comes why it is called cisco HDLC? because cisco added some very important features like:
1. Keepalive Mechanism
2. Added serial link address resolution protocol (SLARP), It is used for the purpose of auto-installation like when router boot up so to fine the TFTP server, get the configuration including IP address etc.
I hope it will be informative for you!
3. Added STAC compression, Its a good one but very processor heavy.
4. Performance Increase (7 - 12 Byte), The header size is increase and this is the beauty of HDLC and works efficiently across WAN.
I Hope this will be informative for You!
Error: %SNMP-3-DVR_DUP_REGN_ERR: Attempt for dupe
ERROR:
SEC 8:000049: Jan 31 22:25:00.760:
%SNMP-3-DVR_DUP_REGN_ERR: Attempt for dupe
regn with SNMP by driver having ifIndex 709 and ifDescr Tunnel0
-Traceback= 204128 204230 92DB90 92DF6C B2CF8C BBF368 BC00C8 1C4EFC 1C5524
1C60B8 1C655C 2EC5CC
Cisco IOS Release 12.4(13b) is a rebuild release for Cisco IOS Release 12.4(13). The caveats (warning) in this section are resolved in Cisco IOS Release 12.4(13b) but may be open in previous Cisco IOS releases.
The following information is provided for each caveat (warning):
•Symptoms—A description of what is observed when the caveat occurs.
•Conditions—The conditions under which the caveat has been known to occur.
•Workaround—Solutions, if available, to counteract the caveat.
Basic System Services
•CSCeb20967
Symptoms: A Route Switch Processor (RSP) may reload unexpectedly when a bus error with an invalid memory address occurs while packets are placed into a hold queue.
[1] "Conditions: This symptom is observed on a Cisco 7500 series that runs Cisco IOS Release 12.0 S, 12.1(14)E4, or 12.2 S when the following sequence of events occurs:
1. A packet is switched via Cisco Express Forwarding (CEF).
2. The egress interface has queueing/shaping configured.
3. The egress interface is congested, causing the packet to be placed into the hold queue."
Symptoms: The following SNMP error message and tracebacks are seen:
SEC 8:000049: Jan 31 22:25:00.760:
%SNMP-3-DVR_DUP_REGN_ERR: Attempt for dupe
regn with SNMP by driver having ifIndex 709 and ifDescr Tunnel0
-Traceback= 204128 204230 92DB90 92DF6C B2CF8C BBF368 BC00C8 1C4EFC 1C5524
1C60B8 1C655C 2EC5CC
Conditions: This symptom was see when new interfaces were added (or existing interfaces like tunnel come up) after bootup, or when new or existing interfaces come up after RPR+ switchover when running Cisco IOS Release 12.0(32)S6. Also, this symptom occurs if the snmp ifindex persist command is configured on the router.
Further Problem Description: Though customer traffic is not affected, this symptom does impact the SNMP stats and other SNMP data for both the original and the new interface. Usually the message is from the standby RP, so once that standby RP becomes active, the data from SNMP polls of these interfaces would not be accurate.
[1] www.cisco.com/en/US/docs/ios/12_4/release/notes
SEC 8:000049: Jan 31 22:25:00.760:
%SNMP-3-DVR_DUP_REGN_ERR: Attempt for dupe
regn with SNMP by driver having ifIndex 709 and ifDescr Tunnel0
-Traceback= 204128 204230 92DB90 92DF6C B2CF8C BBF368 BC00C8 1C4EFC 1C5524
1C60B8 1C655C 2EC5CC
Cisco IOS Release 12.4(13b) is a rebuild release for Cisco IOS Release 12.4(13). The caveats (warning) in this section are resolved in Cisco IOS Release 12.4(13b) but may be open in previous Cisco IOS releases.
The following information is provided for each caveat (warning):
•Symptoms—A description of what is observed when the caveat occurs.
•Conditions—The conditions under which the caveat has been known to occur.
•Workaround—Solutions, if available, to counteract the caveat.
Basic System Services
•CSCeb20967
Symptoms: A Route Switch Processor (RSP) may reload unexpectedly when a bus error with an invalid memory address occurs while packets are placed into a hold queue.
[1] "Conditions: This symptom is observed on a Cisco 7500 series that runs Cisco IOS Release 12.0 S, 12.1(14)E4, or 12.2 S when the following sequence of events occurs:
1. A packet is switched via Cisco Express Forwarding (CEF).
2. The egress interface has queueing/shaping configured.
3. The egress interface is congested, causing the packet to be placed into the hold queue."
Symptoms: The following SNMP error message and tracebacks are seen:
SEC 8:000049: Jan 31 22:25:00.760:
%SNMP-3-DVR_DUP_REGN_ERR: Attempt for dupe
regn with SNMP by driver having ifIndex 709 and ifDescr Tunnel0
-Traceback= 204128 204230 92DB90 92DF6C B2CF8C BBF368 BC00C8 1C4EFC 1C5524
1C60B8 1C655C 2EC5CC
Conditions: This symptom was see when new interfaces were added (or existing interfaces like tunnel come up) after bootup, or when new or existing interfaces come up after RPR+ switchover when running Cisco IOS Release 12.0(32)S6. Also, this symptom occurs if the snmp ifindex persist command is configured on the router.
Further Problem Description: Though customer traffic is not affected, this symptom does impact the SNMP stats and other SNMP data for both the original and the new interface. Usually the message is from the standby RP, so once that standby RP becomes active, the data from SNMP polls of these interfaces would not be accurate.
[1] www.cisco.com/en/US/docs/ios/12_4/release/notes
Subscribe to:
Posts (Atom)