Cisco release IOS 15.0 after a long time, its the major release after long time, The world's leading network infrastructure software, Cisco IOS, delivers transparent integration of technology innovations, business-critical services, and key hardware support.
Full Detail about the new release can be found here
Cisco also remove some features from 15.0 version like AppleTalk Phase I & II and Service Selection Gateway (SSG).
Key highlights of Release 15 M and T, illustrated in Figure 1 below, include the following:
• Feature inheritance from Cisco IOS Software Releases 12.4T and 12.4 Mainline1
• M (extended maintenance) releases every 20 months - allows customers to qualify/deploy/remain on releases longer with active bug fix support
• Standard maintenance 15 T releases - provides the latest features and hardware support before the next M release becomes available on Cisco.com2
• Rebuilds of Release 15 M and T releases for ongoing bug fixes
• Cisco IOS Software Release 15.0(1)M is the first release
Its Very important to have a product knowledge, so it will be helpfull to read it :)
Cheers
Saturday, October 31, 2009
Thursday, October 29, 2009
Booting XM Images on Non-XM 2600 Series Routers
CCIE Preparation in progress and we fell that some of our routers are not able to fulfill our requirements like one of the limitation we can face and I personally faced that our 2600 series routers (2610, 2611, 2620 etc) lack the memory capacity to run the new IOS images, within CCIE (Routing & Switching) boot camp we can quote this problem that it doesn’t support OSPFv3 for IPv6. For us we are lucky that the old 2600 series platform is same as 2600xm series routers just with a bit difference of less processing power and memory capacity. What this means that 2600 series router can boot 2600XM images and therefore run IOS version that support OSPFv3. Now to accomplish this task we have to use “tftpdnld –r” command in rommon mode to boot an IOS image into RAM. As the image will be running from RAM, a TFTP download will be required every time the router is rebooted.
CONFIGURATIONS:
Following is the configuration of a 2610 router running the 12.2(15) T7 IP Plus image. While it does support IPv6 routing but it lacks OSPFv3 support which is our requirement in this case:
CCIE-Router-9 # show version
Cisco Internetwork Operating System Software
IOS (tm) C2600 Software (C2600-J1S3-M), Version 12.2(15) T7, RELEASE SOFTWARE (fc2)
TAC Support: http://www.cisco.com/tac
Copyright (c) 1986-2003 by cisco Systems, Inc
Compiled Sat 09-Aug-03 07:18 by ccai
Image text-base: 0x80008098, data-base: 0x8195144C
ROM: System Bootstrap, Version 11.3(2) XA4, RELEASE SOFTWARE (fc1)
Router uptime is 5 hours, 8 minutes
System returned to ROM by power-on
System image file is "flash: c2600-j1s3-mz.122-15.T7.bin"
cisco 2610 (MPC860) processor (revision 0x202) with 59392K/6144K bytes of memory.
Processor board ID JAD03337409 (4221326695)
M860 processor: part number 0, mask 49
Bridging software
X.25 software, Version 3.0.0
TN3270 Emulation software
2 Ethernet/IEEE 802.3 interface(s)
4 Serial network interface(s)
32K bytes of non-volatile configuration memory
16384K bytes of processor board System flash (Read/Write)
Configuration register is 0x2142 (will be 0x2102 at next reload)
CCIE-Router-9 # config terminal
Enter configuration commands, one per line. End with CNTL/Z.
CCIE-Router-9 (config) # ipv6 unicast-routing
CCIE-Router-9 (config) # ipv6 router ospf 1
CCIE-Router-9 (config) # interface e0/0
CCIE-Router-9 (config-if) # ipv6 ospf 1 area 0
% Invalid input detected at '^' marker.
CCIE-Router-9 (config-if) # exit
CCIE-Router-9 #
In order to boot the XM image we first have to boot the router into rommon mode. To do this reloads the router and press CTRL-BREAK as the router begins to boot.
CCIE-Router-9 # reload
System configuration has been modified. Save? [yes/no]: n
Proceed with reload? [confirm]
*Oct 1 10:59:13.751: %SYS-5-RELOAD: Reload requested by console.
System Bootstrap, Version 11.3(2) XA4, RELEASE SOFTWARE (fc1)
Copyright (c) 1999 by cisco Systems, Inc.
TAC: Home:SW:IOS:Specials for info
PC = 0xfff0a530, Vector = 0x500, SP = 0x680127b0
C2600 platform with 65536 Kbytes of main memory
PC = 0xfff0a530, Vector = 0x500, SP = 0x80004864
monitor: command "boot" aborted due to user interrupt
rommon 1 >
Setting ENVIRONMENT Varaibles:
1. Now next we have to set the environment variables for loading an IOS image via tftp.
rommon 1 > IP_ADDRESS=10.110.9.2
rommon 2 > IP_SUBNET_MASK=255.0.0.0
rommon 3 > DEFAULT_GATEWAY=10.110.9.102
rommon 4 > TFTP_SERVER=10.110.9.102
rommon 5 > TFTP_FILE=FileName.bin
2. Next, issue the "tftpdnld -r" command.
Note: The -r switch is required to instruct the router to load the image to RAM instead of writing it to flash.
rommon 6 > tftpdnld -r
IP_ADDRESS: 10.110.9.2
IP_SUBNET_MASK: 255.0.0.0
DEFAULT_GATEWAY: 10.110.9.102
TFTP_SERVER: 10.110.9.102
TFTP_FILE: FileName.bin
Receiving 2600xm.bin from 192.10.4.254!!!!!!!!!!!!!!!!!!!!
!!!!!!!!!!!!!!!!!!!!!!!!!!!!!!!!!!!!!!!!!!!!!!!!!!!!!!!!!!!!!!!!!!!!!!!!!!
!!!!!!!!!!!!!!!!!!!!!!!!!!!!!!!!!!!!!!!!!!!!!!!!!!!!!!!!!!!!!!!!!!!!!!!!!!
!!!!!!!!!!!!!!!!!!!!!!!!!!!!!!!!!!!!!!!!!!!!!!!!!!!!!!!!!!!!!!!!!!!!!!!!!!
!!!!!!!!!!!!!!!!!!!!!!!!!!!!!!!!!!!!!!!!!!!!!!!!!!!!!!!!!!!!!!!!!!!!!!!!!!
!!!!!!!!!!!!!!!!!!!!!!!!!!!!!!!!!!!!!!!!!!!!!!!!!!!!!!!!!!!!!!!!!!!!!!!!!!
!!!!!!!!!!!!!!!!!!!!!!!!!!!!!!!!!!!!!!!!!!!!!!!!!!!!!!!!!!!!!!!!!!!!!!!!!!
!!!!!!!!!!!!!!!!!!!!!!!!!!!!!!!!!!!!!!!!!!!!!!!!!!!!!!!!!!!!!!!!!!!!!!!!!!
!!!!!!!!!!!!!!!!!!!!!!!!!!!!!!!!!!!!!!!!!!!!!!!!!!!!!!!!!!!!!!!!!!!!!!!!!!
!!!!!!!!!!!!!!!!!!!!!!!!!!!!!!!!!!!!!!!!!!!!!!!!!!!!!!!!!!!!!!!!!!!!!!!!!!
!!!!!!!!!!!!!!!!!!!!!!!!!!!!!!!!!!!!!!!!!!!!!!!!!!!!!!!!!!!!!!!!!!!!!!!!!!
!!!!!!!!!!!!!!!!!!!!!!!!!!!!!!!!!!!!!!!!!!!!!!!!!!!!!!!!!!!!!!!!!!!!!!!!!!
!!!!!!!!!!!!!!!!!!!!!!!!!!!!!!!!!!!!!!!!!!!!!!!!!!!!!!!!!!!!!!!!!!!!!!!!!!
!!!!!!!!!!!!!!!!!!!!!!!!!!!!!!!!!!!!!!!!!!!!!!!!!!!!!!!!!!!!!!!!!!!!!!!!!!
!!!!!!!!!!!!!!!!!!!!!!!!!!!!!!!!!!!!!!!!!!!!!!!!!!!!!!!!!!!!!!!!!!!!!!!!!!
!!!!!!!!!!!!!
File reception completed.
Program load complete, entry point: 0x80008000, size: 0x1176b34
Self decompressing the image: #######################################
############################################################ [OK]
Do show running-config, we can now see that the router has booted and is running IOS 12.2(15) T14 Enterprise Plus, which is only officially supported as a 2600XM image. Most importantly our 2610 router now has OSPFv3 support.
CCIE-Router-9 > enable
CCIE-Router-9 # configure terminal
Enter configuration commands, one per line. End with CNTL/Z.
CCIE-Router-9 (config) # ipv6 unicast-routing
CCIE-Router-9 (config) # ipv6 router ospf 1
CCIE-Router-9 (config-rtr) # ?
area: OSPF area parameters
auto-cost: Calculate OSPF interface cost according to bandwidth
compatible: OSPF compatibility list
default: Set a command to its defaults
default-information: Distribution of default information
default-metric: Set metric of redistributed routes
discard-route: Enable or disable discard-route installation
distance: Administrative distance
CCIE-Router-9 (config) # interface e0/0
CCIE-Router-9 (config-if) #ipv6 ospf ?
<1-65535>: Process ID
cost: Interface cost
database-filter: Filter OSPF LSA during synchronization and flooding
dead-interval: Interval after which a neighbor is declared dead
demand-circuit: OSPF demand circuit
flood-reduction: OSPF Flood Reduction
hello-interval: Time between HELLO packets
mtu-ignore: Ignores the MTU in DBD packets
neighbor: OSPF neighbor
network: Network type
priority: Router priority
retransmit-interval: Time between retransmitting lost link state
advertisements
transmit-delay: Link state transmit delay
Note: The router may not or may display a warning that it is short on processor memory. Ensure to save your configuration early and often in order to avoid losing our work due to a router crash.
To store your router configuration automatically when you save your configuration using write command, consult my post here
Any comments and suggestion will be highly appreciated :)
I hope this will be informative for you !
Cheers :)
Sunday, October 25, 2009
Cisco VPN Client for Windows 7
We can say that October 2009 is the best month for cisco in terms of new introduction like IOS 15, ISR 2nd Generation and the new version of CCIE, Now a windows 7 user face many difficulties in terms of having third party softwares like cisco VPN client so it’s time for Windows 7 and MacOS Snow Leopard to have Cisco VPN Client and Cisco SSL AnyConnect VPN Client versions, available to download.
The Cisco AnyConnect VPN Client provides remote users with secure VPN connections to the Cisco ASA 5500 Series Adaptive Security Appliance using the Secure Socket Layer (SSL) protocol and the Datagram TLS (DTLS) protocol.
AnyConnect provides remote end users with the benefits of a Cisco SSL VPN client, and supports applications and functions unavailable to a clientless, browser-based SSL VPN connection. It runs on Microsoft Windows, Windows Mobile, Linux, and Mac OS X, and supports connections to IPv6 resources over an IPv4 network tunnel. We can configure the security appliance to uninstall AnyConnect from the endpoint after the connection terminates, or it can remain on the remote PC for future SSL VPN connections.
In addition to the Cisco Adaptive Security Appliance 5500 Series, Cisco IOS supports AnyConnect.
AnyConnect Client 2.4 runs on the following new platforms:
•Microsoft Windows 7 (32-bit and 64-bit). See "System Requirements."
•Mac OS X 10.6 and 10.6.1 (both 32-bit and 64-bit).

The following sections describe the new features in Release 2.4, For Detail visit this link AnyConnect
•Split DNS Fallback
•Trusted Network Detection
•Simple Certificate Enrollment Protocol (SCEP)
•Prompting Users to Select Authentication Certificate
•Scripting
•Proxy Support Enhancement
•CSD Integration
•PEM File Certificate Store
•FIPS and Additional Security in the New AnyConnect Local Policy
Monday, October 19, 2009
Setup SSH Server on Fedora
SSH is installing by default on installation of Fedora operating system itself. In this post we will go through the basic setup of SSH server on Fedora Operating System.
Checking SSH server status
a. Using the service command to check the current status of the sshd
[root@myserver ~]# service sshd status
sshd is stopped
[root@myserver ~]#
b. Start SSH server
Start the sshd process using service command.
[root@myserver ~]# service sshd start
Starting sshd:.............................................[ OK ]
[root@myserver ~]#
Automatically start SSH server
By using chkconfig command we can make sure the automatic starting of ssh services when the system reboot. Before this use the following commands to make sure the current status and configuration of SSH services on this machine.
1.Use the following command to check the current status of the sshd
[root@myserver ~]# chkconfig –-list sshd
sshd 0:off 1:off 2:off 3:off 4:off 5:off 6:off
[root@myserver ssh]#
2. Use chkconfig command to automatically start the sshd service for runlevel 3, 4 and 5.
[root@myserver ssh]# chkconfig --level 345 sshd on
[root@myserver ssh]#
3. Verify the change for shhd on runlevel 3, 4 and runlevel 5.
[root@myserver ssh]# chkconfig --list sshd
sshd 0:off 1:off 2:off 3:on 4:on 5:on 6:off
[root@myserver ssh]#
Basically we have done the basic setup process now we can proceed with the confirmation of the SSH services.
I hope this will be informative for you !
Cheers
Monday, October 12, 2009
Clear / Flush DNS Cache to Speed up Internet
DNS (Domain Name Server) cache (A temporary computer memory stored the recent visit pages and help you in quick processing of your request) is stored by Windows (XP and Vista). This cache helps is faster opening of websites already visited on the computer. However, At times this cache becomes corrupted and needs to be cleared.
Clear / Flush Cache Steps
1. Click Start > Run
2. Type cmd and click OK.
3. In black window, type ipconfig /flushdns and press Enter key
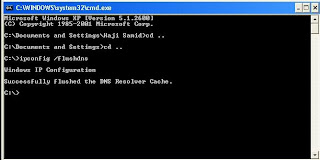
You will see the confirmation message as show above in the picture, There is a space between the ipconfig and flushdns.
I hope this will be informative for you !
Clear / Flush Cache Steps
1. Click Start > Run
2. Type cmd and click OK.
3. In black window, type ipconfig /flushdns and press Enter key

You will see the confirmation message as show above in the picture, There is a space between the ipconfig and flushdns.
I hope this will be informative for you !
How to Block a Website on a Node
If you want to block a web site from vewing on your windows machine, follow these steps to to get the required result.
Steps:
1. c:\WINDOWS\system32\drivers\etc
2. Open hosts file there and append the following line at the end
127.0.0.1 BlockSiteName.com
Note:Replace BlockSiteName with the website name that you want to block on your machine.
3. The go to start --> start --> run --> type
c:\> ipconfig \flushdns
There is a space between the ipconfig and flushdns, now the site will be block but rememberif any one know the ip address of the required site so he can access it still :(
I hope this will be informative for you !
Cheers :)
Sunday, October 11, 2009
Linux: Proxy sshd(pam_unix) Authentication Failure
While looking to my /var/log/message on Linux ( Squid Server, DHCP), i saw the error message shown as title of the post, so after a bit googling i find the solution that it is due to the direct login failure to the proxy server, so to turn off these messages and to avoid the problem we have to disable the direct login of the root account.
The sshd_config file is located at /etc/ssh/sshd_config and it is probably the most common place to find it. If not, we can search for it
# edit sshd_config file
What we want to do is edit this file. We need to uncomment and edit just one line inside this file, at least.
# Vi /etc/ssh/sshd_config
we should be viewing the contents of this file now. We're looking for
#PermitRootLogin yes
Just remove the hash sign (to uncomment the line, or enable it) and change the value to NO. It should look like this after the modifications:
PermitRootLogin no
To make the changes working we have to start the sshd services
# service sshd restart
Now everytime we try to login to our proxy we will using our ordinary user account and then we can substitute to root user.
I hope this will be informative for you !
Cheers :)
Friday, October 9, 2009
Squid Error: No running copy
I saw this error while troubleshooting another problem on squid (DNS issue)
[root@pswproxy etc] # service squid status
squid (pid 3070 3068) is running...
squid: ERROR: No running copy
This is normally due to squid.pid file missing, since this file is present whenever squid is running, if this file is missing squid will not work. If it is deleted by mistake so still squid will be in running condition and will not work properly, so I found this article very useful. In my case I just restart the squid services and it starts working.
I hope this will be informative for you!
Cheers :)
Thursday, October 8, 2009
Squid Error: Reply from unexpected source: 10.110.9.180 # 53, Expected 58.x.x.x # 53
We got problem in our Proxy Server (Squid), we were unable to access internet, The first problem was so pathetic as we were able to ping our local servers that are in LAN but were not able to ping our DNS, after checking our cable and basic network configuration, we got the solution and now we can ping our DNS also, but again PROBLEM start here as we are now able to ping our DNS properly but when we try nslookup so it results in error shown as a subject of this blog. To find out what is the reason behind this error we had to pass from some basic steps to find it exists, let’s look at those steps?
1. First check that our request are reaching to the destination or not, if not so where the packets are dropped, use the following command
# mtr your-dns-ipaddress
or
# traceroute your-dns-ipaddress
2. Check /etc/resolve.conf, for proper DNS entry, the entry should be like
# vi /etc/resolve.conf
nameserver 58.x.x.x
# service network restart
The entry in my case was correct, so we try ping again and it was working but with nslookup the same result (error) was produced.
3. Now issue the following command to check for the proper / correct gateway:
# netstat –r
or
# route –n
The gateway was also perfectly right but still we were not able to do nslookup. Then we made a change in the /etc/resolve.conf file (change our DNS address to another, so it starts working but that was not a good solution as we are directed to use the original one)
After googling and help from my teacher (Nayyar Ahmad) we were at the opinion that TWO Reasons can subsist in this case:
1. Firewall between our machine and DNS and it is blocking port 53 as we can ping. We have communication channel between both just port#53 has problem.
2. DNS services are not running. As we can ping the machine but services are not running, we can check the services from following command
# service named status
Solution:
It was so simple, when we consult the system administrator of head office so they were not allowing our traffic when he added our dns address so everything was working normal.
I hope this will be informative for you!
Cheers :)
ICMP: Source Squench
Source Quench is an ICMP based mechanism used by network devices to inform data sender that the packets can not be forwarded due to buffers overload. When the message is received by a TCP sender, that sender should decrease its send window to the respective destination in order to limit outgoing traffic.
Source Squench has been not consider now a days any more becoz of some reason: i.e
1. Source Squench message can lost in the way to sender.
2. Source Squencs carry very little information per packect say it only sense basci information regarding congestion.
3. Source Quench messages, like all ICMP messages, are expensive for a router to generate. This is bad because the congestion control mechanism could contribute additional congestion, if router processing resources become a bottleneck.
4. Source Squench can also cause Denial of Service.
In effect, ICMP Source Quench messages are almost never generated on the Internet today, and would be ignored almost everywhere if they still existed.
Wednesday, October 7, 2009
Tunneling SSH over HTTP
At times we need to access certain files that we left at home, it is quite possible that some environments and ISPs have strict firewall rules that can make our life miserable and tough in a sense that they have disallow the use of SSH and allows you to use HTTP proxy. “It is possible to use that HTTP proxy as a transport for SSH.”
The purpose of this article is not to advocate breaking out of your environment’s firewall if you have a policy that expressly prevents that or outbound SSH access! Unfortunately in some case it is blocked without any real reason and at times they may allow you to use SSH. In some environments, however, the explicit denial of outbound SSH is required and for that reason we should respect the policy and not override that. I am not at all advocating breaking any rules unless you have permission, exception or proper orders from the people that should provide it.
This all we can done using Corkscrew, click on it and download the source for Corkscrew. Corkscrew is an HTTP-tunneling programming that does not require server-side modifications to work. It is also cross-platform and will work on most client systems.
Steps to Configure:
1. Download it from this source, click on source
2. To build Corkscrew, simply unpack the file and write below commands in the Corkscrew directory
. /configure
make
or make install
3. Using Corkscrew with SSH/OpenSSH are very simple just copy the resulting corkscrew application to somewhere in your ~/.ssh/config, and add:
Host somehost
Hostname somehost.example.com
ProxyCommand /home/user/bin/corkscrew proxy.example.com 8080 %h %p
Replace the hostname with the host you are attempting to SSH into, and replace “proxy.example.com” with the actual HTTP proxy. You may also need to replace the port (8080) if the proxy listens on an alternate port (i.e., port 3128 in the case of Squid). OpenSSH transparently converts the %h to the hostname to connect to (somehost.example.com) and the %p to the port to connect to (22, by default).
When this is done, we should be able to run ssh somehost and have the connection be established, just as if you were connecting directly. One thing to make sure that may be this does not work with all proxies, so it may be a little hit-and-miss, but it should work with Squid and Apache’s mod_proxy module as well as a few other popular implementations.
I hope this will be informative for you :)
Subscribe to:
Posts (Atom)